HOWTO: Use Syncthing to sync between devices
This is a followup on an earlier post I did on how to sync Skyrim saves between devices. In that post, I gave a general overview of recommended ways to go about doing that. In this post, however, I’m going to focus on one of those specific recommendations: using Syncthing.
I’ve now actually tried this tool out and answered a few critical questions about it to my satisfaction, so here’s a post about my findings, and about how you can use this tool.
As with the first post, this is written primarily with the audience of players of the Tuxborn modpack in mind. However, these instructions are not specific to Tuxborn, and can be extrapolated out to any other Skyrim setup. Or any other folder setup, for that matter, whether or not the folders you want to sync contain game-related content.
So let’s begin!
What is Syncthing?
Syncthing is a tool that acts like cloud file storage systems many users will know, such as Google Drive, Dropbox, OneDrive, etc. There are two main differences between Syncthing and these other tools, though:
- It’s open source.
- It does not send your data off to any third-party server, its communication is strictly limited between your own devices, and you have to explicitly authorize the involved devices to talk to each other. So it basically lets you set up your own mini-cloud.
The tool lives at syncthing.net. New users should definitely check out their Getting Started guide, as well as their FAQ.
What platforms does it run on?
Multiple: Windows, macOS, Linux. The two of these of most interest to Tuxborn players are Windows and Linux, since it means easy setup for PCs running a Desktop build of Tuxborn, and handheld devices–whether a Steam Deck running SteamOS, a ROG Ally running Windows, or what have you.
What do you need to do to install it?
On both devices you want to synchronize between, you should install the correct version of Syncthing. Look at their Downloads page for what version you should get.
For PC users, you can just grab the Syncthing Windows Setup mentioned at the top of the page. This will probably also apply to handheld users for any devices that run Windows (e.g., the ROG Ally, the Lenovo Legion Go, etc.). Run the installer as you would any other Windows installer.
If you play on PC but you’re running a Linux distribution instead of Windows, note what the Download page has to say about Syncthing being available via package distribution for several flavors of Linux. So check your usual sources for packages, and you’ll probably find a package for Syncthing that way. (Although, as the Download page warns, it may not be completely up to date.)
For Steam Deck users, there’s no direct download offered on this page. But what you can do instead is:
- Boot your Deck into Desktop mode
- Open up the Discover app
- Search for “syncthing”
- You want to install the thing called syncthing-gtk. Same core functionality, with a Deck-friendly wrapper put around it so you can use it on the Steam Deck.
Advanced users comfortable with working with the command line, including compiling from source if that’s what you want to do, will find several other options further down the downloads page.
How do you set up a connection between devices?
When I did this, I set up a connection between my MacBook and my Steam Deck. Since I’m a Mac user, I installed Syncthing’s macOS application bundle, also available on their downloads page.
What this gave me was a wrapper I could launch off the Mac’s systray, up in the upper right corner of my screen.
Which looks like this:

Not a huge amount of UI here, but that’s because this is a wrapper for the core functionality–which is a web-based GUI that launches in my browser and runs on localhost. If I click on Open on this menu, I can get to that UI.
And that looks like this:

This is a local web page put onto my computer by Syncthing. What you see here is that my computer, lydia.murkworks.net, is set up to talk to a remote device labeled as “steamdeck”.
Two folders are currently being shared: “Default Folder” and “syncthing”.
So what I had to do to initiate a connection to my Steam Deck was to hit that “Add Remote Device” button you see in the lower right hand corner of the page. That UI looks like this:

Here, I followed the instructions given by the UI, and went over to the Steam Deck to look up its device ID. This is how I got to that UI, by launching Syncthing-GTK on the Steam Deck, clicking on the hamburger icon at the top. Note the “Show ID” option on the menu:
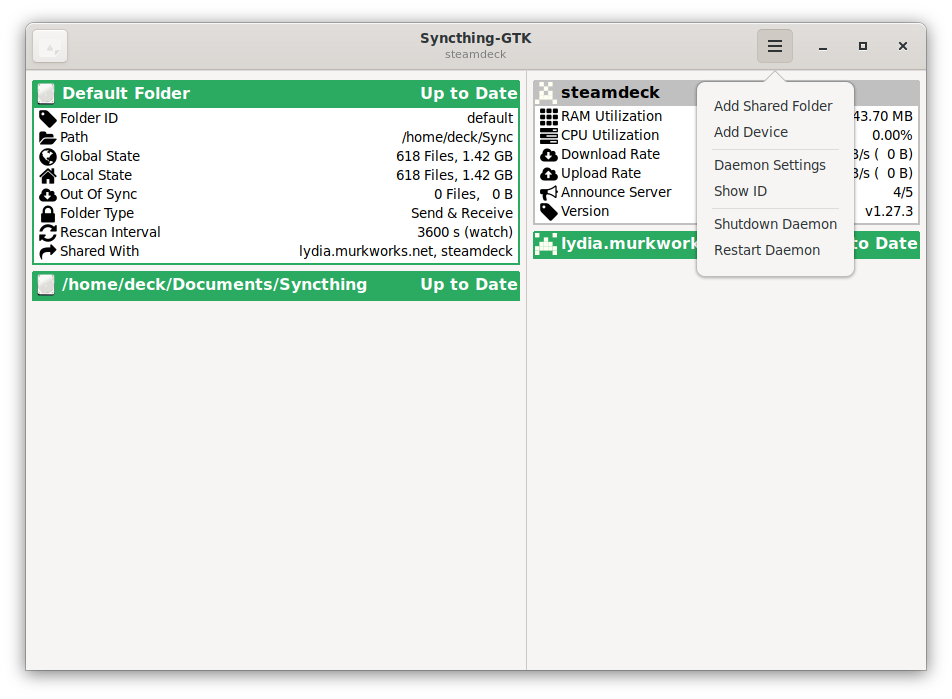
Clicking on the “Show ID” menu brought this up on my Steam Deck:
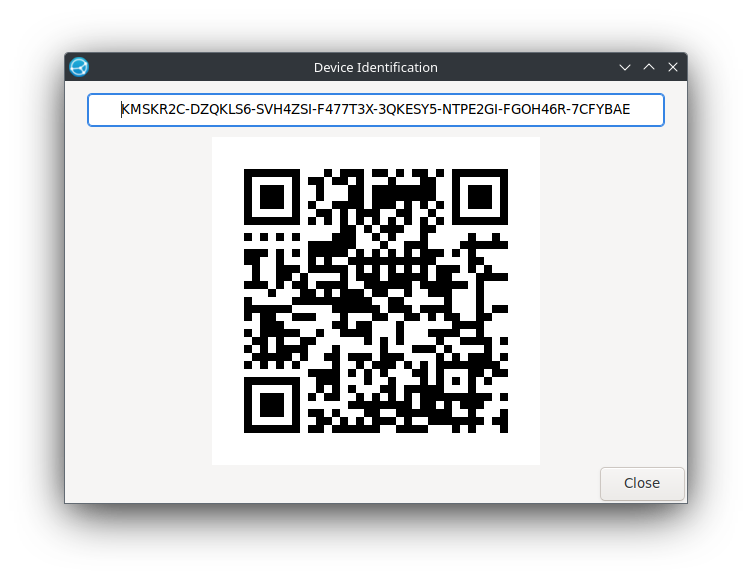
Now, note that in that last screenshot, the device ID is pretty frigging gigantic. Which could be a PITA to type in!
But the good news is, I didn’t actually have to. Because when I clicked on the Add Device button Mac-side, that auto-detected the Steam Deck as a nearby device it could connect to:

Initiating the connection from the Mac triggered a response on the Steam Deck, where I had to authorize the incoming connection.
Once I did that, though, I was able to establish the connection, and move on to selecting folders for it to synchronize.
Syncthing default folder
By default, Syncthing creates a “Sync” folder as a folder you can use to start with. On my Mac, the path to this folder was /Users/annathepiper/Sync.
You may wish to fiddle with the settings on the default folder, if you want it to be named something else, or have a different path.
Additional folders
In my testing, I was also able to confirm that Syncthing allows for the use of other folders besides the default, anywhere in the file structure.
So I tested this by creating a “Syncthing Test” folder underneath my Documents folder, on the Mac. Which led me to an important discovery: creating a similar folder on the Deck, in the equivalent location, did not create the same default folder ID. Syncthing-GTK did not like the space in the folder name.
So therefore, important tip: if you’re going to create folders from scratch for Syncthing to use, you may want to avoid using spaces in the folder names.
Trying this a second time, with the folder just named “Syncthing”, worked just fine.
Use cases
There are two major scenarios where Tuxborn players might want to take advantage of using Syncthing.
Synchronizing Tuxborn saves
For this use case, the most likely scenario is going to be that you want to play Tuxborn on both a desktop PC and a handheld, such as a ROG Ally.
HUGE CAVEAT HERE: I cannot personally confirm that these steps work, because I do not have a PC I can play Tuxborn on. I am extrapolating based on my testing between my Mac and my Steam Deck. I would really appreciate it if any Tuxborn player who can play on both a desktop PC and a handheld device can confirm for me if these steps work! I will update this post accordingly if I get that confirmation.
For purposes of example, I’m going to assume that you want to use the TuxBFCO – Desktop profile on your computer, and the TuxBFCO – Handheld profile on your Ally. These two profiles are save compatible, so your goal here is going to be to make sure you can synchronize the saves between your computer and your Ally.
I am also going to assume that you’ve decided to install Tuxborn in a Games directory on both devices, and in a Tuxborn directory under that. So your install path to Tuxborn would be Games/Tuxborn. CHANGE THIS AS APPROPRIATE, I AM USING THIS ONLY AS AN EXAMPLE HERE!
Here’s what you need to do first:
On your computer
- Make sure you have a working Tuxborn install
- Create your character as per standard Tuxborn install procedure, and get a current save as soon as you finish chargen
- Quit the game and check your TuxBFCO – Desktop profile directory
- There should be a “saves” directory there now, with your new save in it (there may be two since you also will probably have an autosave from just after you get out of RaceMenu)
- Make sure you have installed Syncthing
- As per above description, set up Syncthing to have a connection with your Ally
On your ROG Ally
- Make sure you have a working Tuxborn install (copying all the files down off your computer should suffice for this, you do not have to go through the entire install process twice)
- Make sure you have installed Syncthing
- Approve the connection request from your computer so that the computer and Ally can talk to each other and keep files in sync
Once you have a working Tuxborn install in both places, and a viable saves directory on your computer, then you can move on to the important part: telling Syncthing to synchronize everything in the saves directory down to your Ally.
Here’s how you do that.
On your Ally
Do these first because you’ll want them done before you do the computer steps.
- Navigate to the full path for your TuxBFCO – Handheld directory, for our example that will probably be:
C:\Games\Tuxborn\profiles\TuxBFCO - Handheld- You won’t have a saves directory there yet. Make one
- Now make sure Syncthing is running on the Ally, if it’s not already
On your computer
- In the UI for Syncthing, under the Folders section, click on Add Folder
- Fill in a Folder Label if you want one, this is optional though
- Folder ID is not optional, though, and it has to be the same on both your computer and your Ally; it’s okay to leave it at whatever the default is, but you can change it to something else more meaningful if you wish
- Under path, fill in the entire path to your TuxBFCO – Desktop saves directory. Which will probably look something like this:
C:\Games\Tuxborn\profiles\TuxBFCO – Desktop\saves- Click on the Sharing tab in the UI, which should be the next tab over from where you filled in the above info
- You should see a checkbox for your Ally on this tab, select that
- Click on the Advanced tab in the UI, the last tab available
- You should see a Folder Type dropdown control, select Send & Receive on that, since you’ll want to be able to synchronize your saves in both directions
- Click the Save button, and then Close
On your Ally
Back over on your Ally, do this:
- You should now see a notice that your computer wants to share a folder with the Ally, tell it to do so
- You will get a UI similar to the share UI you had to use in the previous steps
- Set a Folder Label if you want one, it doesn’t have to be the same as the one you used on the computer
- Make sure the Folder ID is the same, those do have to be the same
- For folder path, you will want to either manually fill in the entire path to your TuxBFCO – Handheld saves directory, or use the UI to navigate to the saves directory you will have just made there, either way should work
- Again, click on the Advanced tab and set Folder Type to Send & Receive
- Save and close
This should be all you need to do, and you should then see the saves from your computer automatically show up on the Ally, and vice versa.
Retrieving screenshots
This is the use case I can personally confirm, because this is the one more immediately relevant to me. Since I use screenshots a lot in my posts on this blog, it’s very important for me to be able to get my screenshots quickly off my Steam Deck and up to my computer, where I can easily include them in posts.
Up until now, my solution for this has been to use Dropbox, and tell Steam to save uncompressed copies of my screenshots to a Dropbox directory. However, with Syncthing now an option, I’m able to take Dropbox out of the picture.
So this is what I did to get this to work.
- Got Syncthing working on both my Mac and my Steam Deck, as described above
- Created a directory I want to use for screenshots; for this purpose, I put a “Steam Deck Screenshots” folder underneath the default “Sync” folder that got made, when I did the setup
- Shared that folder from the Mac down to the Steam Deck
- In Desktop mode, got into Steam’s settings, and under In-Game, told it to save uncompressed screenshots out to the Sync/Steam Deck Screenshots directory now shared to the Steam Deck
- Followed this tutorial on Reddit to allow Syncthing’s daemon to start automatically in either Desktop or Game Mode
- Confirmed with Tuxborn running in Game mode that if I took a screenshot, it showed up on my Mac within seconds
Conclusion
Overall, now that I’ve had a chance to play with this tool first-hand, I can definitely recommend it for the two use cases I’ve described here, synchronizing Tuxborn saves between devices, but also quickly sharing screenshots.
If you have any questions, drop me a comment and let me know!
Reference links
- Syncthing’s documentation
- Syncthing’s Getting Started guide
- Syncthing’s FAQ page
- Reddit tutorial to get Syncthing working automatically on Steam Deck in both modes
Edited to add
- 5/31/2025: Added instructions to the proposed PC/Ally procedure to set Folder Type to Send & Receive, for two-way syncing of save files
Angela Korra'ti
As Angela Highland, Angela is the writer of the Rebels of Adalonia epic fantasy series with Carina Press. As Angela Korra'ti, she writes the Free Court of Seattle urban fantasy series. She's also an amateur musician and devoted fan of Newfoundland and Quebecois traditional music.