In Which Tembriel Does Not Let the Burial Caverns Daunt Her
After the previous session’s annoyances, I was bound and determined to make some progress on hitting the Urshilaku Burial Caverns. So for this pair of sessions, I did a side quest for the Fighters Guild, for the express purpose of getting enough gold to train up more for hitting the Burial Caverns again. Result: still haven’t cleared them, but I did make significant progress!
Highlights
- Play dates: 11/4-11/5/2022
- Session number in this run: 29-30
Friday’s play
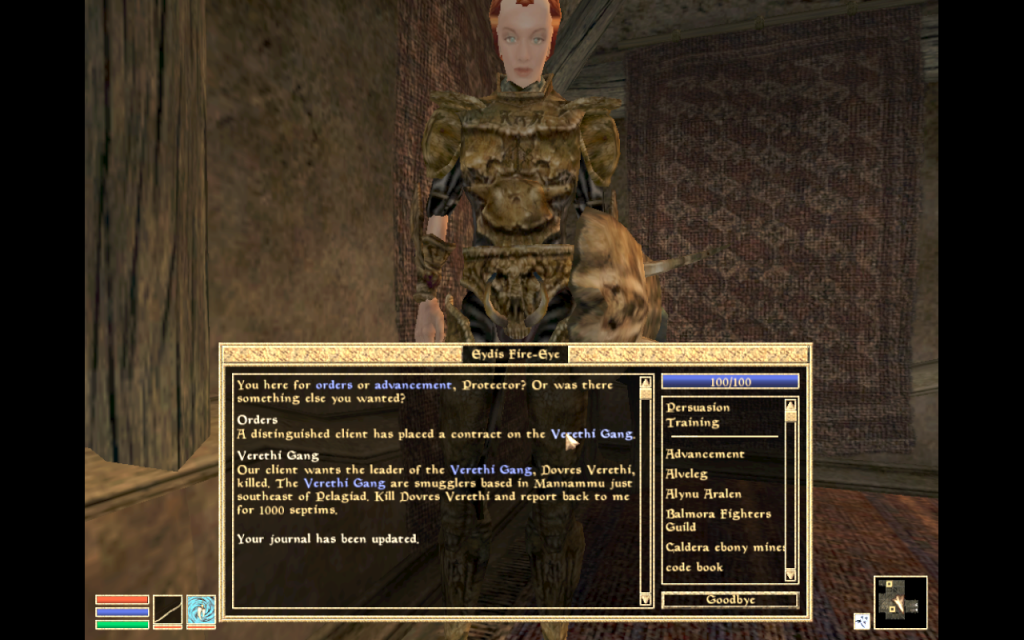
- Buckled down for some side questing; took Fighters Guild quest to go run a bounty at Mannammu near Pelagiad
- Ran the place with no challenge at all
- And boy howdy was it full of loot; took seven or eight trips in and out to get all the loot out
- Sold stuff in Pelagiad, Vivec, Fort Moonmoth, and Balmora
- Also paid for getting my Alchemy up to 40, and boosted Alteration and Mysticism some more as well
- Kept buying coda flowers from both the Vivec alchemist and the one in Fort Moonmoth, which let me make a few more levitation potions
- Popped briefly into House Hlaalu and got a bit more training in Short Blade and Mercantile
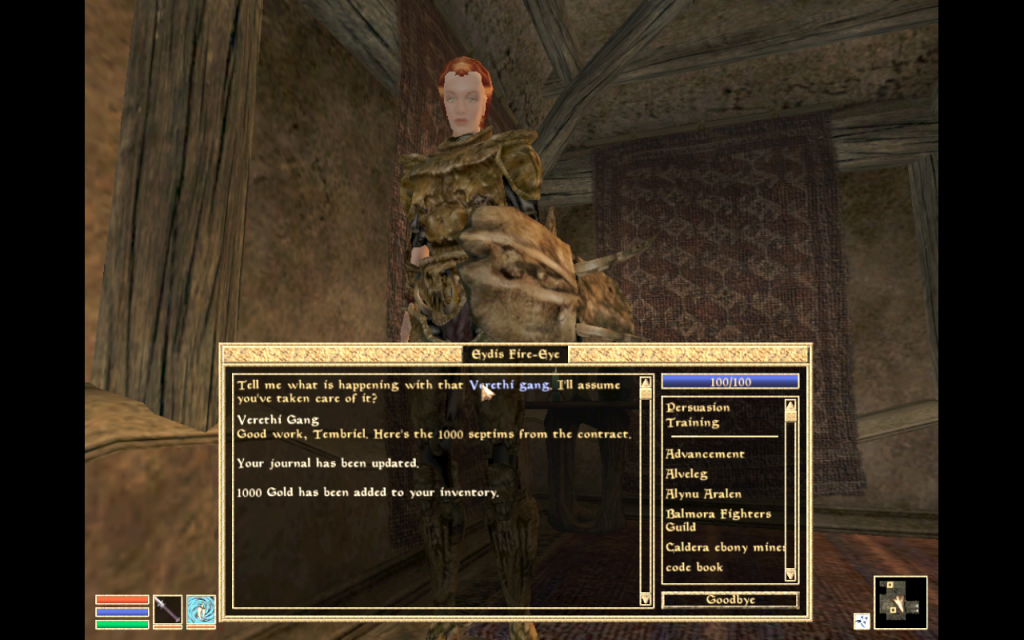
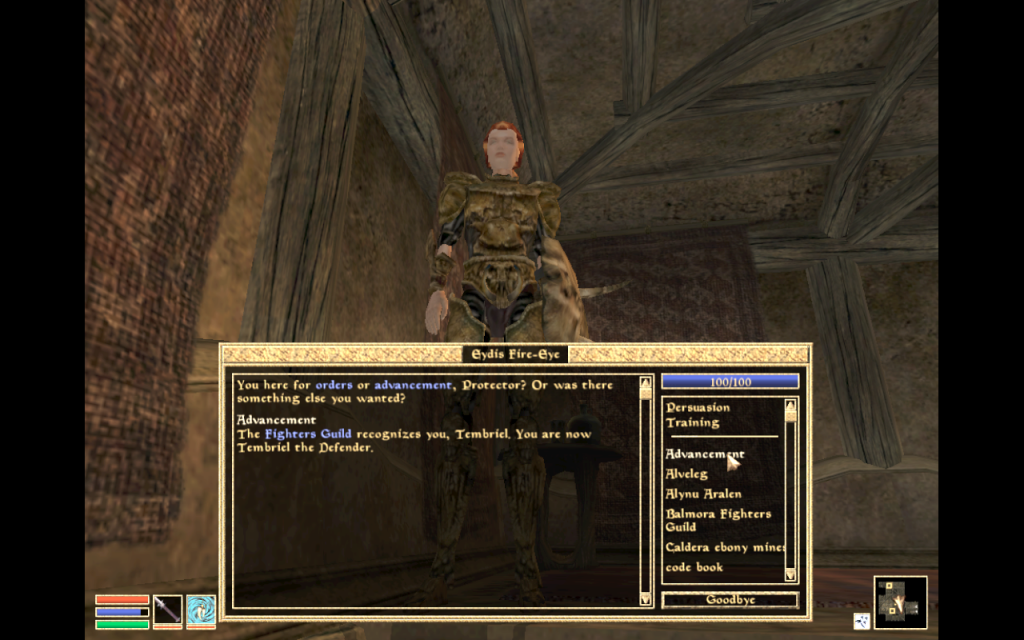
- Finally got Eydis to pay me for running the bandit bounty
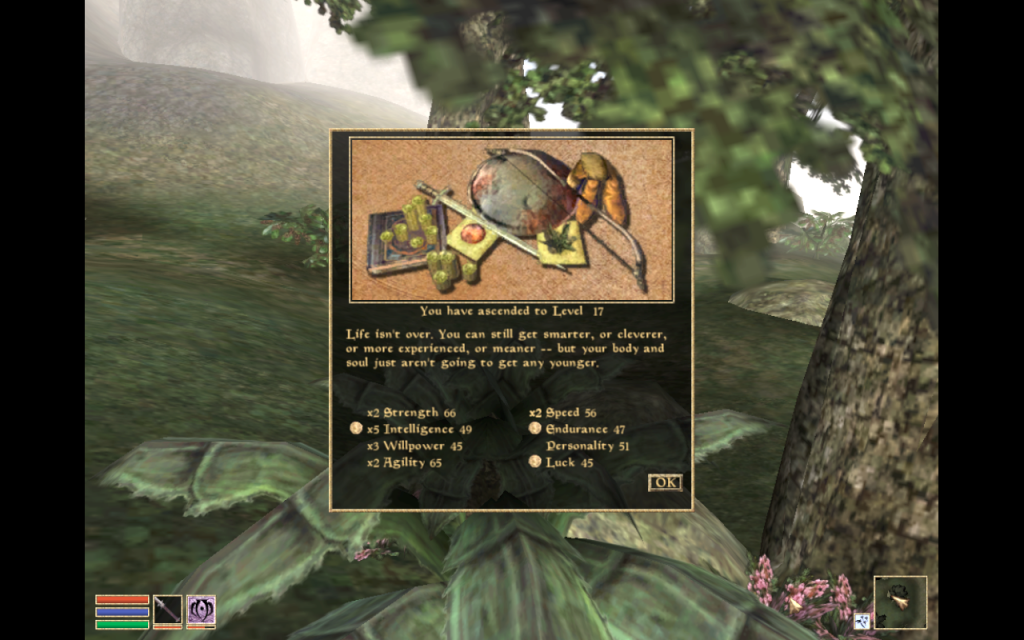
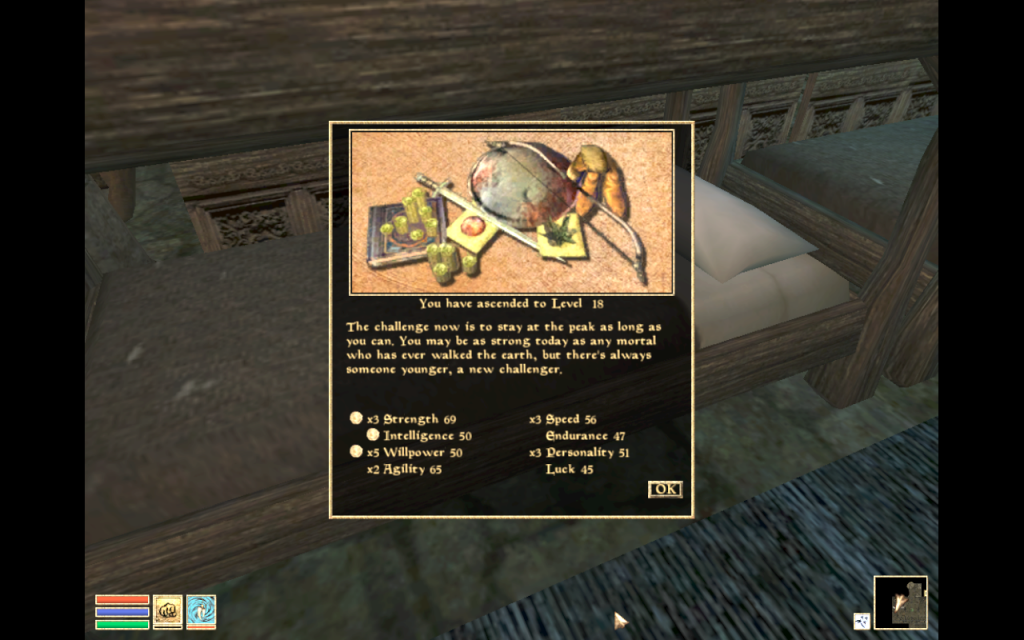
- And somewhere in the midst of all this I leveled up 17; took bumps in Intelligence, Endurance, and Luck
- All in all very lucrative side trip and very beneficial for prepping me to get through the Burial Caverns
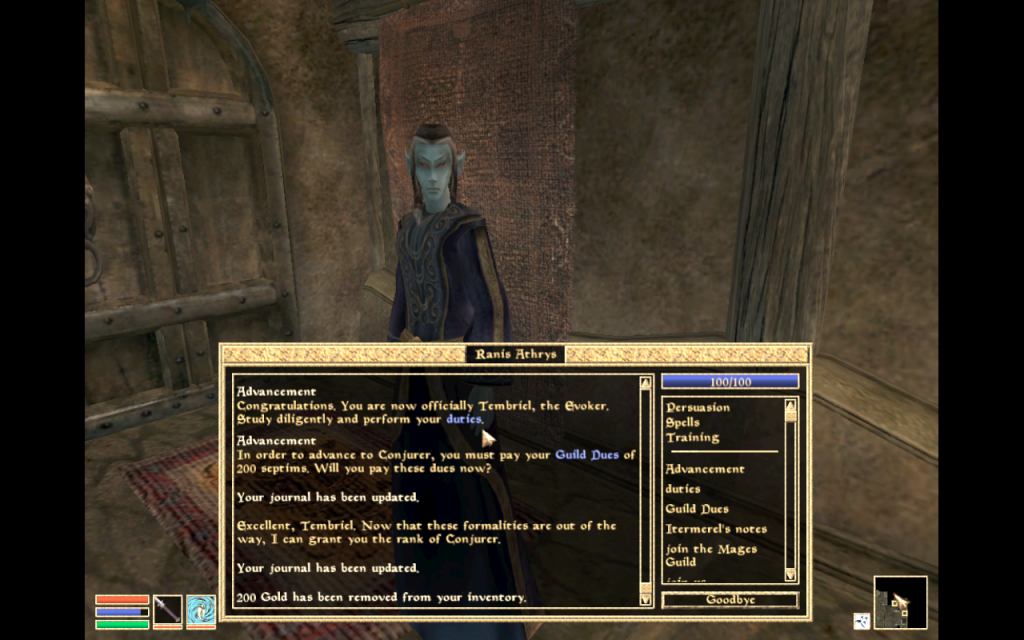
- Got the Mages Guild to promote me up a couple more levels
- And got Eydis to promote me up another level in the Fighters Guild
- After a break to play ESO, went back to the Burial Caverns for another go
- Had to hoof it back up there since I’d reset my Mark to get in and out of Mannammu
- Boinged back through Ald’ruhn and Maar Gan, then hoofed it from there
- Got attacked by another Dark Brotherhood assassin while resting to heal up
- Got killed once when doubleteamed by a cliff racer and a corprus stalker
- Flailed around a lot trying to find my way back north to the caverns (did I mention I dislike not having fast travel?), but eventually made it back and had to fight my way through the first couple sections again
- But this time discovered that my better levitation means were enough to get me through!
- And that I had enough charge on the Steel Blade of Heaven
- And that I could actually now cast the Levitate spell as long as I had enough magicka
- Discovered dead adventurer in the second chamber and got some decent loot off of that
- Made it to the third chamber and re-cast my Mark
- With better levitation I was able to finally find the Restoration skill book, and make it up to the hidden ledge with the Wizard’s Staff (fuck yeah!)
- That got me access to an Illusion skill book and other good loot as well, but that also overloaded me
- So I amulet’d out to Gnisis and sold as much as I could, including Dark Brotherhood gear
- Boinged once from there to Ald’ruhn to sell some of the stuff there as well
- Then finally retreated to Balmora and saved for the night
Saturday’s play
- Did a little more training at the Mages Guild; bumped up Alchemy, Alteration, and Mysticism some more, and boosted Restoration enough that I was able to level up to 18; dropped points on Strength, Intelligence, and Willpower
- Then boinged back to the Burial Caverns for another go
- This time I ducked into that first side chamber off of the Laterus burial chamber, which is called Fragile
- Took out skeletons and Ancestor Ghosts in both side chambers off of there
- Found another dead adventurer and took a couple of the better things off of same
- Had to check each side chamber twice to get a couple of important things: a Bone Charm amulet i’d missed, and also the key to the underwater door to the place with the really good loot
- Potion of Water Breathing was required to get me down there and through in time; fortunately I had two
- Key unlocked the door
- Took out a skeleton as well as the Worm Lord, who was basically a slightly more powerful skeleton
- Got an enchanted blade off of him, and then the rest of the really good loot! Ebony Closed Helm and Glass Tower Shield, and another skill book
- Amulet-boinged out of there and landed in Gnisis, where I’d left Apprentice hammers and the previous dwarven greaves I’d gotten off the earlier dead adventurer in section two of the Burial Caverns
- Burned through a bunch of the hammers repairing my gear
- Sold one of the dwarven greaves to the vendor at the temple, and that freed me up to be able to go to the silt strider
- Boinged back to Balmora for inventory management
- Parked in Mages Guild for the night
Commentary
It’s a damn good thing I’m enjoying Morrowind’s plot line, because with how hard the game seems determined to make it for me to advance, if I wasn’t enjoying the plot, I’d have bailed a long time ago. But at this point, I’m invested. I’ve put enough work into moving Tembriel along that I feel like if I bailed now, I’d lose out on reaching the part of the game where things finally start to get a little easier.
So I’m all “goddammit, The Urshilaku Burial Caverns will not defeat me“.
And now that I have a reliable way of filling soul gems, this is helping things considerably. I spent a good amount of time just selling those gems and using the resultant gold to train up Alchemy, Alteration, and Mysticism, which had a few immediately useful effects:
- I could make better Levitate potions. I went from potions with stats of “1 for 4 seconds” to “5 for 16 seconds”.
- I could actually cast the Levitate spell, which I discovered once I made it back to the Burial Caverns.
- Improved ability to cast Mark and Recall, too.
- Got three of my magical stats up high enough that I was able to get promoted up two more ranks in the Mages Guild, which now puts me at Conjurer.
I even had enough extra gold to spend a bit on training up Short Blade and Mercantile, too. Mostly because if I’m going to be hitting things with Soul Drinker for soul trap purposes, it’d be nice to actually reliably hit things with the blade. And Mercantile, to make my prices with merchants slightly less terrible.
The work on my magic skills also let me get promoted up a couple more levels in the Mages Guild, bumping me from Journeyman to Evoker to Conjurer.
And while I was at it, I also got Eydis to bump me up from Protector to Defender in the Fighters Guild.
And the Mannammu bandit lair was amazingly lucrative, for that matter. It took me seven or eight tries to get all the loot out of the place, and I kept having to alternate between Pelagiad, Fort Moonmoth, Balmora, and even Vivec to sell it all. Some of the loot was skooma and I did have to explicitly take that to Ra’Virr in Balmora.
All in all, it was extremely helpful in getting me prepped for another go at the Burial Caverns.
It took me a bit of effort to get back there, since I’d had to reset my Mark while running Mannammu. But once I did, I was very satisfied to discover I finally had decent enough means of levitation to get to the good stuff in the third chamber. Better potions were critical, and I tried to emphasize using those first, before starting to burn through the restored charge on the Steel Blade of Heaven.
Similarly, I discovered that if I was maxed out on magicka, I could in fact cast the Levitate spell. But that was a thing I could only do once or twice on the first visit back to the caverns, because I had to rest up and let my magicka recharge. Second time through, I brought some potions of Restore Magicka with me. I thought to check the supply chest at the Ald’ruhn Mages Guild specifically, since the one at Balmora’s Guild HQ hasn’t restocked in a while! So I found potions there.
Having better means of levitation finally meant that I was able to score the critical loot in the Laterus chamber (the third one, with all of the winding stone pathways) I hadn’t gotten yet: namely, the Restoration and Illusion skill books, and the Wizard’s Staff. The staff in particular is important because a) another means of levitation, and b) I’ll need it later for advancement in the Mages Guild. But I’m going to have to keep tabs on when I’ll actually need levitation, because that staff adds 16 units of carry weight, so I am dubious about always carrying it.
And I ran the Fragile chamber as well, which is the first one you can get to from Laterus. This took a little planning, since the really good loot in there was only accessible by going through a locked door underwater. And I had to explicitly look for the key that would unlock the door. Also, damned good thing I had a couple of potions of Water Breathing with me! Note to future me, as well as any Morrowind players who don’t already know this: be prepared with not only means of levitation, but also means of water breathing when you get to the point of tackling the Burial Caverns.
Here’s why the potion of Water Breathing was important: because I knew there was a Glass Tower Shield in there, and I definitely wanted that. I’m tired of wearing the Dark Brotherhood armor, which as I’ve noted before, is quite ugly. And glass is the only other option I have to step up from that armor. So I definitely want to start getting more of it.
There was also an Ebony Closed Helm in there, which I want to like more than I actually do. But as in Skyrim, ebony is a Heavy Armor. And not only am I not usually a heavy armor person, I’m also not willing to load myself down with heavy armor in this game in particular. Not when Morrowind makes it impossible for you to move if you’re overloaded.
But I took the helm anyway. It says it has a value of 15000 gold, so if nothing else I should be able to sell it. The question is going to be who I can sell it to. The scamp in Caldera, maybe? But Creeper has only 5000 gold. I may need to finally hunt down the talking mudcrab merchant, who has 10000 gold to play with.
The Worm Lord was less of a fight than I was expecting. He was essentially a slightly more powerful skeleton, who was able to cast spells. But he wound up not doing me much damage while I whacked him to death with my Daedric katana.
Next time
Still to do in the Burial Caverns: I think Kefka, the second of the chambers accessible from Laterus, was the one I’d hit before and which got retconned when I lost that progress. So I think I’ll try hitting that once more for loot gathering purposes. Kakuna was the third of the chambers, and there’s at least one bit of good loot in there, so I may also check it out.
Which will leave Juno, the final chamber, which is where the bow is. But I don’t know if this is going to be one session’s worth of play, or two.
I spoke some with the folks on the Skywind server about my strategy here, and was strongly encouraged to tweak what I’ve been doing running dungeons up till now. If I run the whole dungeon first, killing all the monsters, I should then be free to move loot around to specific places and create a stack of it. Then I can grab it all, even if it burdens me, and get out in one go to somewhere where I can actually sell it.
So I’m going to try that. Then I’ll see about getting back to the Ashlanders with that bow.
And another thing I’m going to have to figure out how to do, now that I’ve talked to the Skywind server folks about this too: getting at least one piece of gear enchanted with either a Fortify Strength or a Feather enchantment. Which is going to be expensive if I want it to be a permanent enchantment. All the more reason to figure out how the hell to sell the ebony helm.
Screenshots
Editing to add
- 11/24/2023: Restored missing gallery.
- 10/11/2024: Converted gallery to native WordPress one.
Angela Korra'ti
As Angela Highland, Angela is the writer of the Rebels of Adalonia epic fantasy series with Carina Press. As Angela Korra'ti, she writes the Free Court of Seattle urban fantasy series. She's also an amateur musician and devoted fan of Newfoundland and Quebecois traditional music.