HOWTO: Set up a radial menu on a Steam Deck game
I’ve mentioned using radial menus in various games on this blog before, for play on my Steam Deck. Originally, I figured out how to do this while setting up to play Morrowind! But in the last couple of years of my gameplay, I’ve used it a lot more for Elder Scrolls Online, and to a lesser degree, Skyrim.
It’s come into play again with my running the Tuxborn Skyrim modpack. And since I’ve been asked about this on the Tuxborn Discord, I thought I’d do a writeup of how I build radial menus on my Deck, to help other Steam Deck players.
So let’s get started!
Opening notes
This writeup will focus on using Tuxborn play in Skyrim as an example. All instructions here, though, can be used for setup on other games as appropriate.
Also, I will focus specifically on using radial menus, since that’s the setup I’m familiar with. The Steam Deck does include other types of menus you can use to configure your trackpads to your liking. But I haven’t tried those, so I’m not going to go over those here.
Lastly, I’ll focus on using the left trackpad in particular, because that’s what I use. Note however that I’m a right-handed player. A left-handed player might choose the right trackpad instead, and that’s okay. All of the instructions I’m going to go over here should work on either of the Steam Deck’s trackpads.
And a word of caution I’ll give to fellow Tuxborn players: for a lot of this setup, you should probably do it while Tuxborn is not actually launched, unless you need it active to doublecheck or set hotkeys. The reason for this is, I’ve had Tuxborn crash out from under me while trying to make changes to my radial menu. I did report this to the Tuxborn devs, but there’s not a lot they can do about it, since the root cause lies with how Skyrim interacts with SteamOS. Just be on the lookout for this, and don’t edit your radial menus while the game is running, any more than absolutely necessary.
Step 1: Find where to put your settings and make a radial menu
Everything I’m doing here is in the controller settings available for every game in a Steam Deck’s library.
Players running Tuxborn, you should do this in the controller settings for Tuxborn, not in the settings for your standard Skyrim.
You can, of course, also set up a configuration in your standard Skyrim if you want. But Tuxborn won’t pick up on it, since it’s running its own copy of your Skyrim install, not your actual Skyrim install.
So here’s how to find the settings.
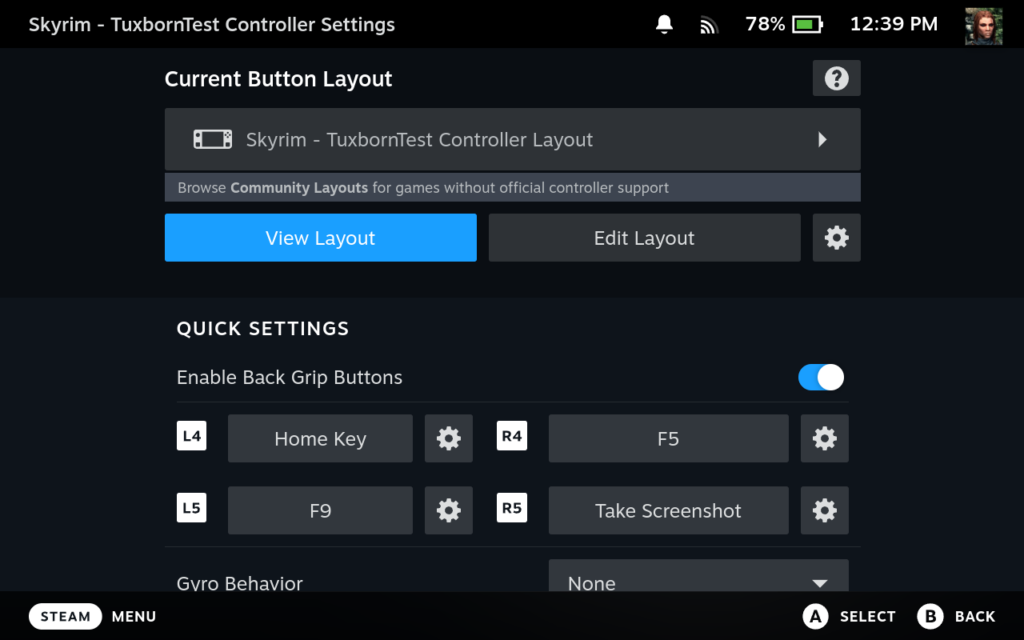
- Open Tuxborn in your Steam Deck library, but do not actually launch it.
- You should see a controller icon over on the right, select that.
- You should get a UI for viewing and editing your layout.
This is where you can edit all sorts of stuff about your controller layout: your main buttons, your back buttons, your trackpads, whatever you want to do.
Here’s what that UI looks like:
Step 2: Set up the left trackpad with a new radial menu
Now that you’ve found the settings, and you’re in the UI for editing your layout, the next thing you want to do is to tell your Left trackpad to activate a radial menu.
- Select the Edit Layout button.
- Use your left stick to scroll down to Trackpads. Select that.
- You should now see settings for your Right and Left trackpads. The Right one will be listed first, so make sure you select the Left one.
- There’s a dropdown menu here. On that menu, select “Create Radial Menu”.
- You’ll be asked to name your menu. Call it whatever you want. For my Tuxborn setup, I called it just “Tuxborn”.
The menu should look like this:
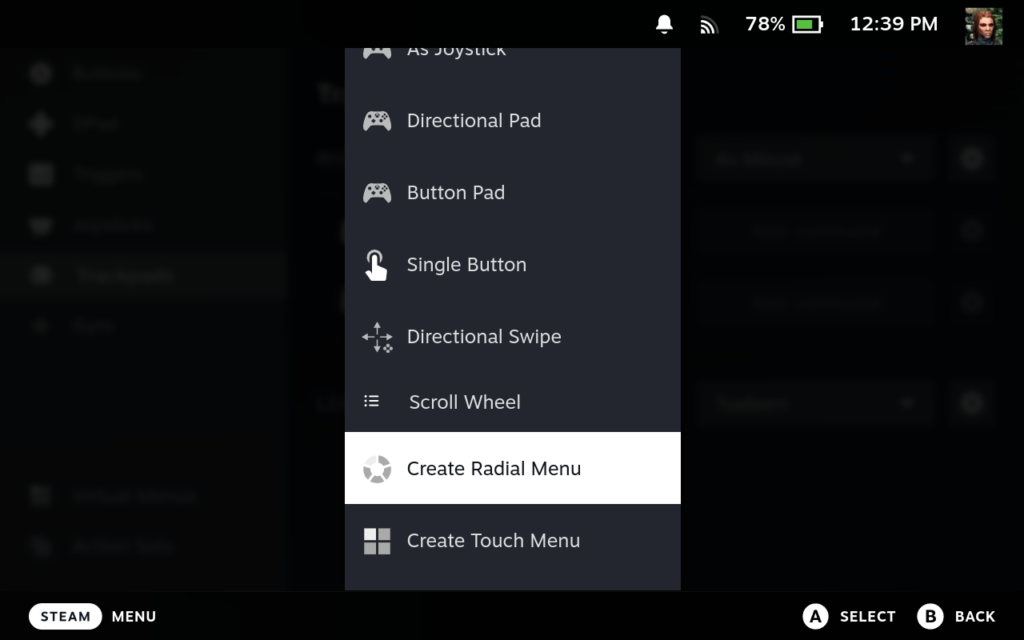
So now you should have that menu ready to activate and you can move on to filling it in.
Step 3: Adding items to your menu
Don’t leave the Edit Layout UI! Because now, you’re going to want to fill in that menu with stuff you’ll find useful while playing Tuxborn (or whatever other game you’re setting up for).
- On the left sidebar of your Edit Layout settings, you should see an item for Virtual Menus.
- Navigate to that and select it.
- You should now see the Radial Menu you set up in step 2.
- Now you can add stuff to it!
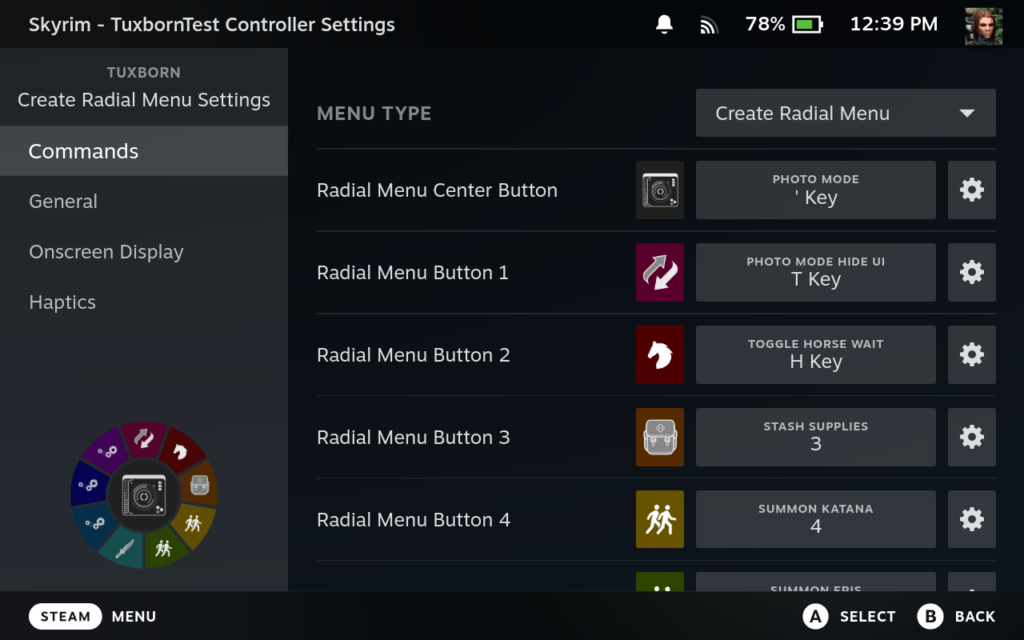
You can set the center button for the radial menu, and up to 20 menu items that surround it. And the thing to keep in mind when setting these things is, mostly, you’re probably going to want to emulate key presses that PC players might use when running the game. So you’d want to be aware of the various hotkeys available in your game, whether Tuxborn, vanilla Skyrim, ESO, or whatever.
Here’s what the UI for my radial menu settings looks like on my Deck:
Step 4: Setting the Center button
The very first item in this radial menu is for the center button. What you put here is entirely up to you. I recommend putting something here you consider critical to your game play, whatever that might happen to be.
In my setup for Tuxborn’s 0.5.2 build, I put the single quote button there since that hotkey was provided by the No Compass in Dialogue mod, and it was a handy way to toggle the UI on and off.
In my setup for Tuxborn’s current build (1.1.3), I mapped that center button to Photo Mode instead. But I set the hotkey for that to also be single quote, to be consistent with what I did in 0.5.2.
So set this for whatever works for you.
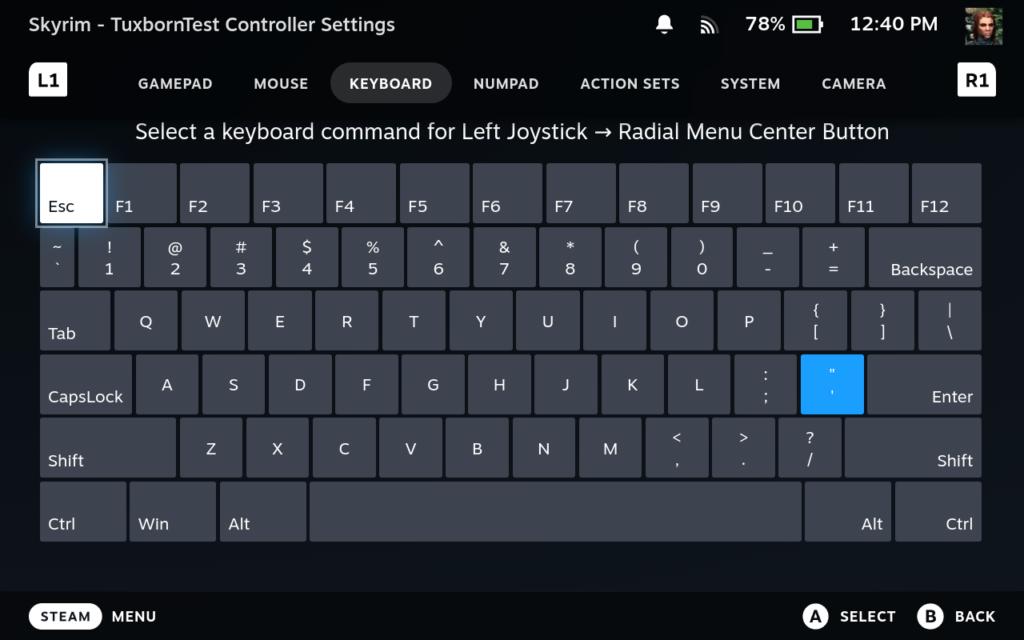
By default, this button won’t be assigned to anything. As soon as you select it, you should get a UI that will let you choose how to map the button. This will land you on a keyboard layout, so you can easily choose whichever button you want. And you can also use your bumpers to navigate to other options, if you want them.
Here’s the UI for the keyboard layout, where you can choose what button you want to assign to the menu item.
Step 5: Adding additional menu items
Once you have your center button set to however you want it, then you can move on to adding other items to the menu. All additional items you put in will show up in a ring around that center button, when you touch your trackpad.
As I noted above, you can add up to 20 items, though of course you don’t have to do that many. Put in however many you actually want to use.
In the UI just under the center button, you should see a button for Add Virtual Menu Entry. Use this as many times as you like, to add items to the menu. And once each item is created, you set it the same way you set the center button, just by activating the Add Command control in the UI.
“But what should I put on them?”
Anything you want! Here’s a list of what I have set on my radial menu for Tuxborn build 1.1.3:
- N key, for the UMC Check command
- H key, for toggling the Wait/Follow state of my horse
- Hotkeys 3-6 for favorites
- F1 key set up via SkyUI, where I made a group to dual-wield daggers
- End key, for loading the UI for Community Shaders
- Backspace key, for loading the UI for Immersive Equipment
- Right Shift key + O, for loading the UI for Open Animation Replacer
If you aren’t playing a BFCO profile in Tuxborn, then you don’t need to set favorites 1 and 2 on your radial menu. You can get at those via the left and right buttons on your D-Pad, by default.
But if you are playing a BFCO profile, which rearranges how the D-Pad is mapped, then you may also want to add favorites 1 and 2 to your radial menu along with 3-8.
Some other options you might consider are things I set on my Steam Deck’s back buttons, but which could also be easily used on a radial menu as well:
- F5 for QuickSave (highly recommended, to make it a lot easier to remember to actually save your game)
- F9 for QuickLoad
- Take Screenshot
For the Screenshot mapping, I used the “System” section of options in the UI to choose how to map that button, not the “Keyboard” options. And I did that because I find the Steam + R1 button combo a bit awkward, especially when I’m in the middle of combat when I want to take an action shot! So if you feel the same way, you might consider this as a back button or radial menu option.
“Hold up, you set Right Shift + O for something? How do you map two keys?”
Yes, Open Animation Replacer requires upper case O to launch, not lower case o. So in order to make that work on the Steam Deck, I had to set two things on that radial menu item. So this required not only setting a primary command, the Right Shift key, but also a sub command, which I set to be O. This tells the Deck that when I select that item, it’s supposed to send Right Shift + O, to simulate upper case O vs. lower case o.
Here’s what that UI looks like:
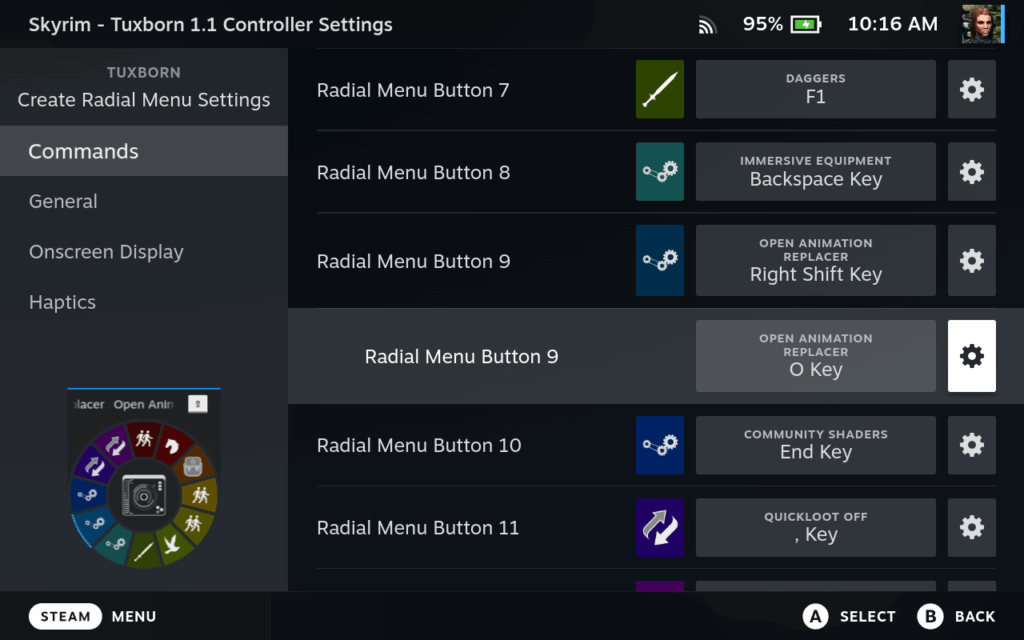
Mind you, Tuxborn players should not have to worry about this very much, unless you think you might want to get into the Open Animation Replacer settings on a regular basis. Vast majority of things you’ll want to set as radial menu options should require only one key.
But in case you do run into something like Open Animation Replacer which requires two, setting a sub command for the second key is how you do it. Setting a sub command is one of the options available on the Settings gear icon next to each radial menu option.
“What did you set for your favorites?”
Here’s what I set on my various favorites if you want to follow my example:
- Primary weapon. This is usually a sword for me, either one-handed or two-handed, depending on what I feel like at any given point in the game.
- Secondary weapon. This is usually a bow.
- Stash Supplies spell from Legacy of the Dragonborn.
- Summon Auri, using the power provided once you get her as a follower.
- Call Remi spell, which you receive when recruiting Remiel as a follower.
- Roovi, the Dwemer hummingbird automaton you receive from Xelzaz, which lets you do various things with him, including summoning him to you
- Elmlock Blade
- Currently unset, but this may wind up a flex option for me depending on what I need during the rest of my playthrough
Step 6: Making your menu items actually work
Now, there are actually two parts to making the menu items you want to set work properly. The first of these is to create the menu items, as described above. But the other part is to set things appropriately inside Tuxborn itself, so that your menu items will do something when you select them!
There are two likely use cases for this, mapping Favorites, and mapping hotkeys you want to use for various mods.
Mapping a favorite
For example, making my mapping of “3” on my menu work required me to do this:
- Create the radial menu item set to “3”
- In Tuxborn, go to the Stash Supplies spell in my magic list, and mark it as a Favorite
- Bring up the Favorites menu and scroll on it till I get to the Stash Supplies spell
- Use the newly created menu item for “3” to map 3 to that particular Favorite
- End result: that menu item now wields the Stash Supplies spell
Mapping a hotkey to launch something
You’d do something similar for setting hotkeys to launch various mods. For example, when I set my radial menu’s center button to be single quote, and for it to launch Photo Mode, that required me to do these steps:
- Map the center button on the radial menu to single quote
- In Tuxborn, go to the Photo Mode MCM
- Go to the option for setting a hotkey to launch Photo Mode in gamepad (which is what I need for Steam Deck)
- Use the newly mapped center button to send single quote to the MCM so that Tuxborn now knows I want single quote to be my hotkey for this
Step 7: Naming all your menu items
For each and every item on the radial menu, including the center button, you should see a gear icon for settings to the right of each one once it’s created. That icon will let you set various interesting settings for each menu item.
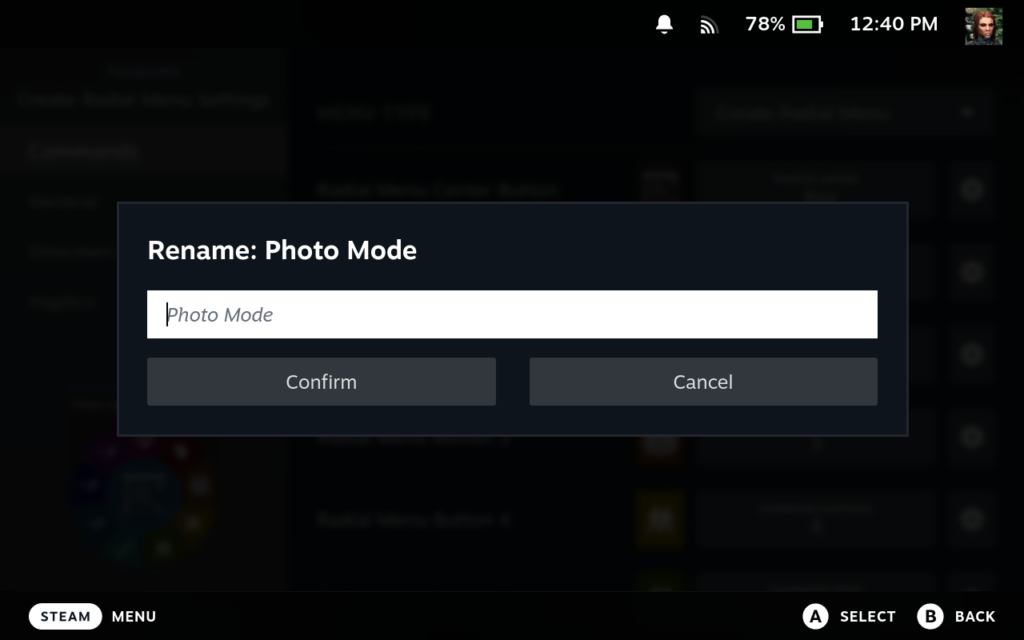
For me, the most useful thing it lets you do is to rename each item to something meaningful. Whatever you set as a name for the command will actually show up in the radial menu!
This will make it a lot easier to tell at a glance what each item on the menu is supposed to do. Set whatever names will help you keep track of that.
Here’s what the dialog for renaming a menu item looks like:
Step 8: Adding icons and colors to your menu items
This part’s optional, but very handy to improve the overall look of your menu.
When you set up a radial menu, by default, what you will see showing up on the menu when you activate it are the various keys that the menu items are mapped to. While this is informative, it’s not necessarily visually pleasing. But you have options to fix that!
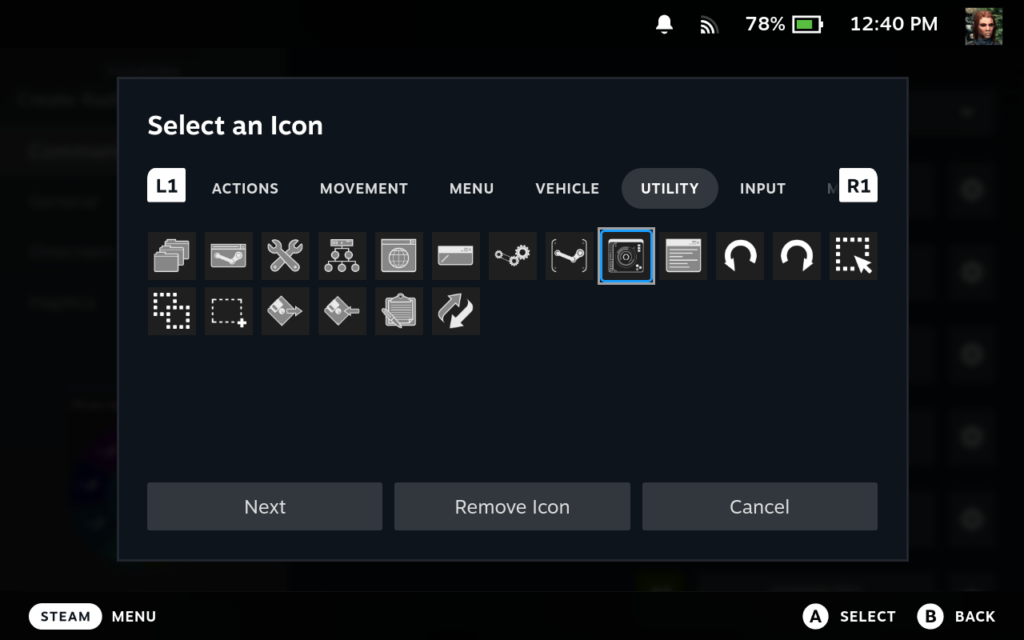
In the menu editing UI, to the left of each menu item, you should see an empty circle at first. This circle is the control you can use to set an icon for the menu item.
When you select and activate one of these circles, you will be taken to a Select an Icon UI. This will let you pick and choose from a bunch of icons SteamOS provides you! So take the time to look over the various provided ones, and see if you want to use them.
In this same UI, once you choose an icon, you can also set foreground and background colors for it. I usually leave the foreground color as white, but set the background colors to different things, so that the menu looks prettier. Choose whatever colors work for you!
Here’s the UI for setting icons:
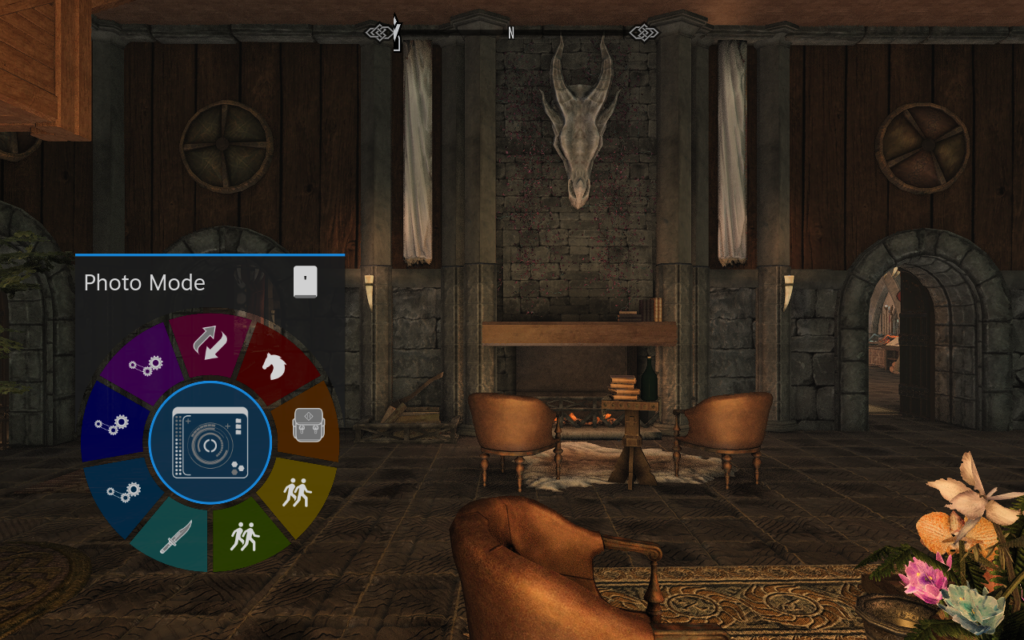
And last but not least, here’s what a finished radial menu can look like, when I tap on my left trackpad. This shot was taken as of one of Tuxborn’s test builds, but it still shows the same idea:
Step 9: Saving your work
With all of these changes, I highly recommend you take the time to actually save what you did so you can come back to it later if necessary.
To do that, follow these steps:
- In the main Edit Layout UI, you should see a gear icon to the right of the Edit Layout button.
- Select that gear.
- You should get a Layout Options menu.
- Select Export Layout.
- This should give you a Save New Layout dialog.
- Fill in a Layout Title and Description as you like.
- Leave Export Type set to “New Personal Save”.
- Then click the Confirm button to save your changes.
I especially recommend doing this if you happen to be running multiple Tuxborn builds, and you have different setups for each. You don’t want to mix those up!
That’s it!
That should be more than enough to cover most if not all of the hotkey situations you might need in Skyrim, and in Tuxborn’s version of Skyrim in particular.
For other games, your mileage may vary, especially if the games in question are a lot more keyboard-driven than Skyrim needs to be.
For example, Morrowind was not originally designed for controllers, it was designed for keyboard and mouse. So just about all major game functions in Morrowind need this kind of help if you want to play Morrowind on a Deck.
And while ESO does play well on a Steam Deck, if you’re like me and use a lot of ESO addons, chances are you need to set a whole lot of hotkeys to use them. So I had to get real fancy with my ESO radial menu–and set up not only a primary menu, but nested ones beneath it. I’ll cover how to do that in another post.
Any questions? Let me know!
Editing to add
- 9/26/2025: Revised to clarify that when you set a radial menu option, you should also take steps inside the game itself to make that option actually work. And also, added a section describing how to set a sub command on a radial menu option, in case you want it to send two keys.