HOWTO: Set Tuxborn Skyrim modpack to save to Steam Cloud in Deck Dolphin app
Update to this post: this information should now be considered OUT OF DATE. I’ve written a new post to cover ways to synchronize your saves, while also accounting for .SKSE data, which does NOT synchronize to Steam Cloud. Look at this post for details.
This post is a followup to my previous one, about how to make the Tuxborn Skyrim modpack save its games out to the Steam Cloud, since Tuxborn is not set up to do this by default. In the previous post, I provided information on how to do this if you’re comfortable using the Steam Deck’s command line.
In this post, I’ll talk instead about how to do this task using Dolphin, the Steam Deck’s file explorer app.
Tell Dolphin to show hidden files
As with the command line scenario, you will need to do all of this in Desktop mode on your Steam Deck. And you will need to look for the two locations I spoke about in the previous post, which are:
- The place where your regular Skyrim saves all its games
- The place where your Tuxborn saves all its games
Before you do anything else, though, you need to make sure your Dolphin app is allowed to see “hidden” files. You can do this by the following steps:
- Open Dolphin
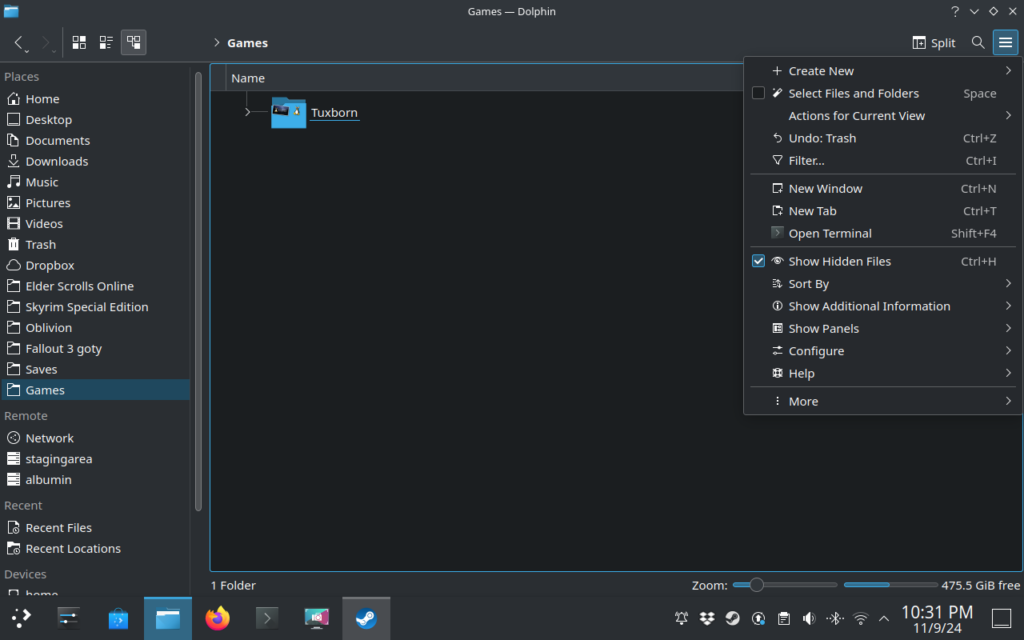
- In the upper right hand corner of the app, look for the “hamburger” icon that has three horizontal bars, and click on that
- You should get a menu with several commands on it, and a checkbox with the label “Show Hidden Files”
- Make sure the checkbox is activated
Here’s a screenshot of what this should look like:

Find your default Steam saves location
Once you’ve done this, then you should be able to use Dolphin to navigate deep to the directory where Steam saves your games by default. Unless you did some customizations on your Deck to make your install path different from default, it is very likely going to be a path that looks like this:
/home/deck/.steam/steam/steamapps/compatdata/489830/pfx/drive_c/users/steamuser/Documents/My Games/Skyrim Special Edition/Saves- In Dolphin, click on the Home icon at the very top of your sidebar on the left.
- You should now see a whole bunch of hidden directories. One of these should be named .steam, click on that one.
- Proceed through the above path I’ve listed (or your own version if you have a different one), until you reach the “Skyrim Special Edition” directory. STOP before you go into the Saves directory.
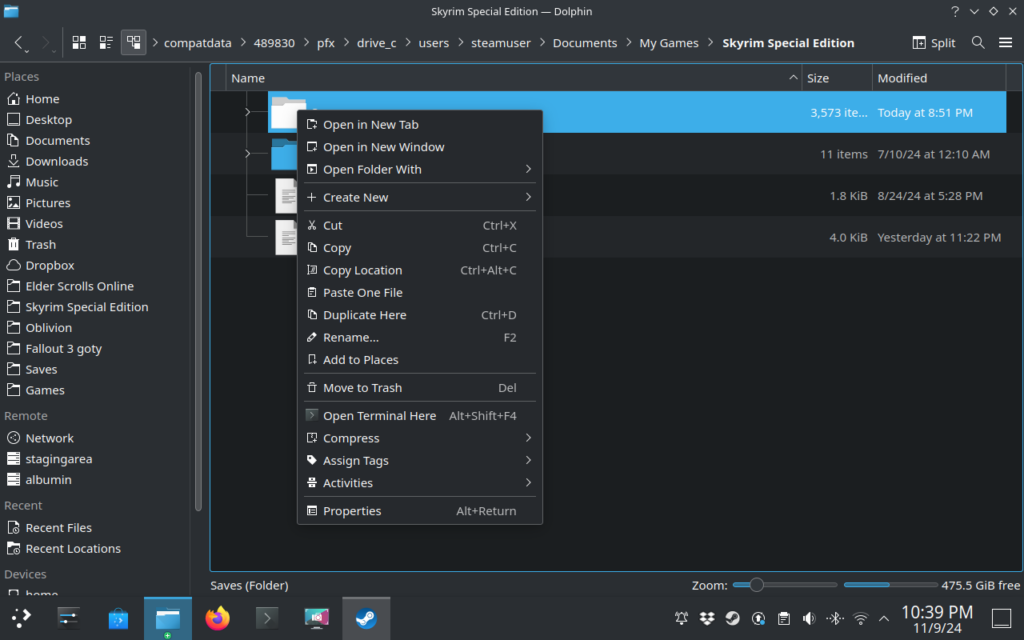
- Once you see the Saves directory, right click on it.
- You should get a menu with a bunch of options on it. Select “Copy Location”.
Here’s another screenshot of what that menu ought to look like:

(TIP: Once you see this menu, you may also want to select the “Add to Places” option, which will pin this Saves directory to your sidebar on the left. Which will make it a lot easier to find it in the future!)
Now that you’ve got that location copied, now comes the final step.
Copy a shortcut to that location in your Tuxborn saves directory
In Dolphin, you should now go to the place where you did your Tuxborn install. That directory has a lot of stuff in it, but what you want to do is find the directory for the specific profile you chose in the Tuxborn setup.
On my Deck, I told Tuxborn to install under “Games/Tuxborn”. I also selected the “Tuxborn – Deck” profile.
So the location I would need for this is as follows:
/home/deck/Games/Tuxborn/profiles/Tuxborn - DeckAgain, this may be different on your device, depending on where you told Tuxborn to install, and what profile you chose. So adjust these steps as appropriate for your own device:
- In the Dolphin app, navigate to your Tuxborn install directory
- Look for the “profiles” directory and click on that
- Look for the specific profile directory that matches the profile you chose in setup, for example “Tuxborn – Deck”, and click on that
- You should see several items in that directory, including a subdirectory called “saves”
- OPTIONAL BUT IMPORTANT: If you have any saves already in Tuxborn that you care about keeping, rename that saves directory to a backup name. Right-click on it, and select the “Rename…” command to call it something else, whatever you want
- Now click somewhere just to the left of your list of files and folders to dismiss your menu
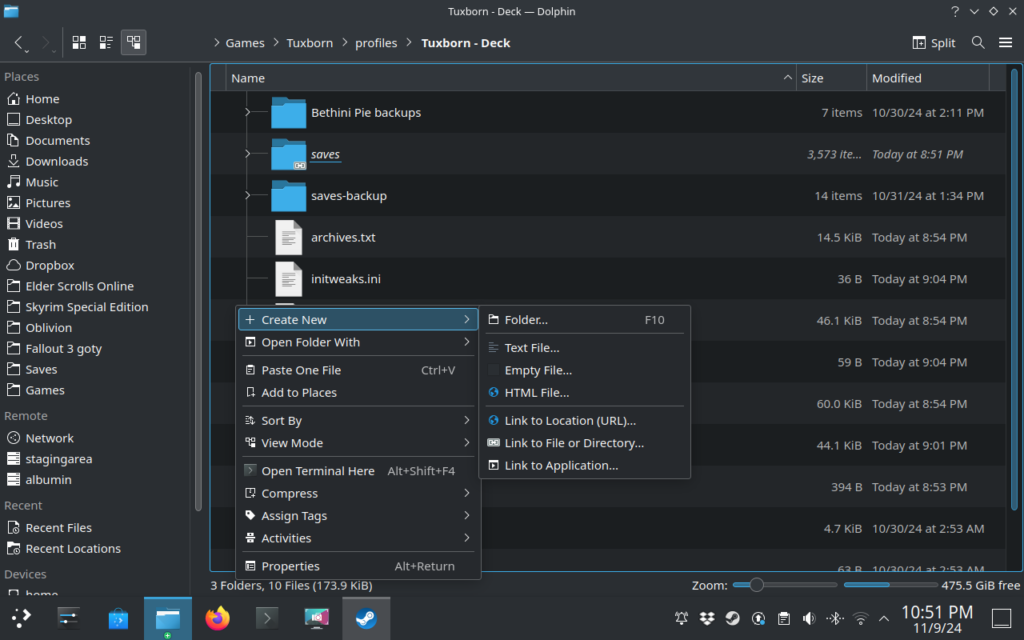
- Right-click again to get a menu for actions you can take in the directory in general
This is now the important menu you want to look for and where you will make the link I talked about above. Here’s a screenshot of what you should be looking for:

The command you want is the second to last one on the submenu in that screenshot, “Link to File or Directory…”
- Click on the “Link to File or Directory…” command
- You should get a small dialog box with two text fields in it, “Name for new link” and “File or directory to link to”
- Right-click on the second field, and select “Paste” from the menu
- The location you copied in the steps above should now fill in that field
- You will also see “Saves” fill in on the first field, but with a capital S, I recommend changing that to a lowercase “saves” instead just because that’s what Tuxborn had there by default
- Click the OK button to finish
Here’s a screenshot of what it should look like before you hit the OK button:

Once you hit your OK button, the next thing you should do depends on whether you have any data in the backup of the original saves directory.
If you did have data in that backup you want to send out to the Steam Cloud, then you should:
- Click into that directory
- Select everything in it, and copy it
- Then click back up to the previous directory, and then into the new “saves” directory you just made a link to
- Paste everything you just copied into this directory
Finally, you should be ready to test your changes. Follow the same testing steps I suggest in the previous post where I talked about how to do this in the Deck’s command line!
And that’s it!