My current modding setup on Steam Deck (Updated)
This week I was contacted on Twitter by a user with the handle Shadark. (Hi, Shadark!) This person was going down the same path I’d done, trying to get Skyrim Together Reborn running on the Steam Deck. We got to talking on Discord, and I agreed to provide some screenshots of what my current setup is.
But during that conversation, I realized it might actually be better to do so here on the blog. Shadark found me googling for help about modding on the Steam Deck. But if anybody else needs this information, I figured it would be nice to have a cohesive walkthrough I can point at!
Previous posts of mine were more scattershot, and contained a lot of experimentation. So here’s a more up to date post, pulling relevant bits of data out of previous posts and presenting them in a more coherent fashion. Hopefully this will be useful not only to Shadark but to any other Steam Deck players who might be interested in modding Skyrim on their devices.
Since Shadark was specifically interested in Skyrim Together Reborn, I’ll be talking about that some in this post, but my setup is not just for that mod. If STR is not a thing you want to try playing, feel free to disregard the parts of this post explicitly related to that, which is section 9.
This is in-depth geekery so I’m putting it all behind the fold. (Dreamwidth folks, if you’re reading this via crossposting, as near as I can tell the post came through okay over to Dreamwidth. It looks okay from my DW account. If it does not look okay for you, let me know.)
Part 1: Overview of my current setup
First and foremost, my Skyrim build is 1.6.640, most recent release from Bethesda of the Anniversary Edition. I’m new enough to the modding experience that I haven’t had time to build up a mod history with earlier versions of the game. I figure that since the Deck is also a super new platform to game on, still, it’s unlikely that most players are going to want to use an earlier version of the game.
The main tools I installed to accomplish this include:
- Steamtinkerlaunch
- Vortex, which is normally a thing you’d want to install from Nexusmods.com, but in this case I installed it via Steamtinkerlaunch, using their instructions for how to do so since Vortex doesn’t currently have a native build available for the Deck
- Protontricks, installed via the Discover icon in Desktop mode
- Flatseal, also installed via Discover
- Konsole, also installed via Discover
Two caveats to this. If either of these apply to you, they are outside the scope of what I’m writing about here.
- If I’m wrong and you happen to be a player who for some reason wants to use an earlier Skyrim build on your Steam Deck, or,
- If you prefer using Mod Organizer 2 over Vortex. I have experimented a little with MO2, but I just prefer Vortex. If you happen to want to use MO2 instead, you might check out this YouTube video, which I’ve linked to before.
Part 2: A bit of initial prep
Fair warning: all of this work is stuff that will be way easier for you to do if you’re familiar with working with a Linux command line. Savvy users however will note that the Steam Deck’s screen is quite small, and arguably very awkward for purposes of in-depth tinkering.
I strongly recommend getting an external keyboard talking to your device. The Deck does have an onscreen keyboard you can launch, but it eats half of the screen real estate when you launch it. And if you’re trying to see a command line, this makes typing extremely awkward.
I went the route of a Bluetooth keyboard. The one I’m using can be found here and I like it pretty well, though I do not recommend it for users with large hands. You should use whatever keyboard suits you.
If you have a dock for your Deck and are able to plug it into an external monitor or television, I also do heartily recommend that just to give yourself screen room to see what you’re doing. Some of the work I did here was done with my Deck docked to my television.
One other option I have not yet tinkered with, but which may suit you, is to set up SSH access to your device so you can access it from your computer. If you want to try this approach, I found instructions on how to do so here.
Last but not least, if you don’t have it immediately available already, I recommend you install the Konsole utility via Discover to get access to a terminal window. You’re going to need that. I recommend adding it to your device’s desktop or dock as well, for ease of launch.
Part 3: Installing steamtinkerlaunch
As I mentioned in a previous post, as of when I did my setup, there was a version of steamtinkerlaunch available on the Discover icon. However, reviews on it indicated it was not functional. I instead chose to install directly off of the github repo for the tool, which worked for me well enough. Their instructions on how to do so are here.
Once you get steamtinkerlaunch itself installed, there are a couple other things you’ll want to do as well.
Setting steamtinkerlaunch in your path
I added the following to my .bashrc file in my terminal window:
export PATH=$PATH:/home/deck:/home/deck/Downloads:/home/deck/stl/prefixThis was me adding a couple of extra directories to my system path, notably, /home/deck/stl/prefix. This directory is the one created when you install steamtinkerlaunch, and adding it to your path will mean that you don’t have to cd into that directory just to launch it. So I recommend you do this for your convenience.
Note that I also included the root of my /home/deck account space, as well as /home/deck/Downloads. You can keep those or not in your path as you like. Put in whatever directories you like in this command, though you may wish to make sure you specify the entire directory tree for each one.
Setting steamtinkerlaunch as a compatibility tool
In theory this should get done when you install steamtinkerlaunch to begin with. So to confirm this, you’ll want to go into your Steam and look at the settings for Skyrim. You specifically want the “Compatibility” settings. There, you should see “Steam Tinker Launch” available as an option. Select that.
If you do not see “Steam Tinker Launch” as an option, then you’ll need to go back to your terminal and enter this command:
steamtinkerlaunch compat addPart 4: Create a VORTEX collection in your Steam and add Skyrim to it
Steamtinkerlaunch’s instructions mentioned creating a collection called VORTEX in Steam, and adding Skyrim to it to get it to launch properly with the initial menus, as well as access to Vortex on launch if you want to do that.
This is easy enough to do. This screenshot is from my Mac’s Steam client, not the Deck, but the UI is the same. Look for the left sidebar where it says HOME towards the top, and the grid of four small white squares. I’ve circled it on this screenshot. Click or tap on that to launch the UI you see here to create a collection.
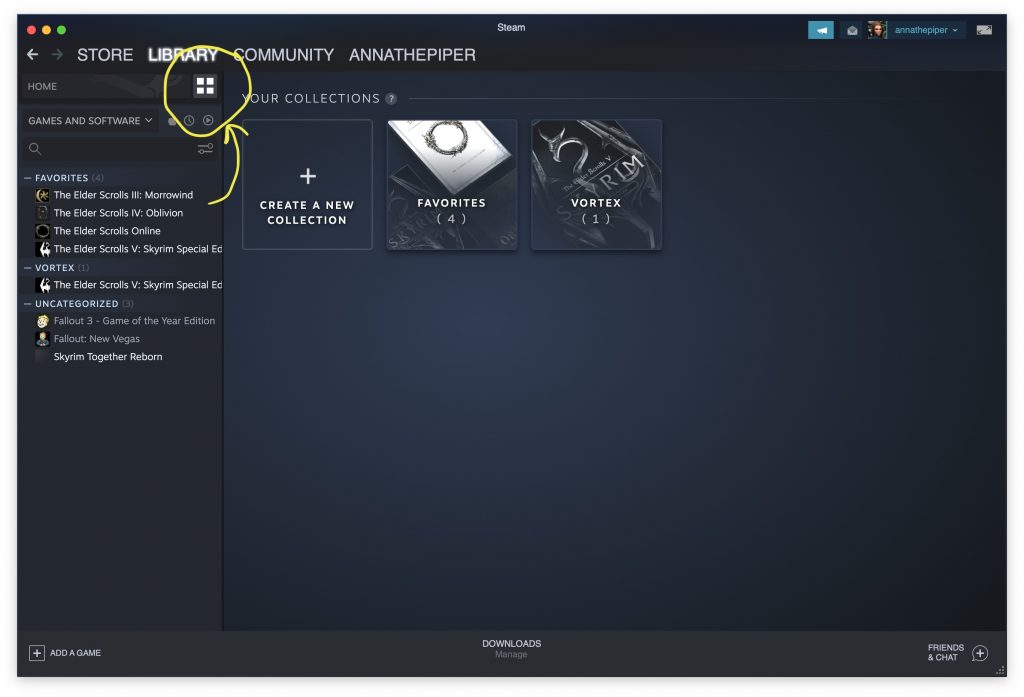
Important side note here. You’ll notice that the collection name comes through here in all caps. Steamtinkerlaunch thinks it needs to be “Vortex”.
When I originally did my setup, Steamtinkerlaunch didn’t like that discrepancy in capitalization. I had to get around it by the following steps:
cd /home/deck/stl/prefix/collections
ln -s Vortex.conf VORTEX.conf
What this did was create a symbolic link called VORTEX.conf that pointed right to Vortex.conf, so as to make steamtinkerlaunch pick up on the correct collection.
HOWEVER, and this is the big caveat: as of this writing, that symbolic link has vanished off my install and may have been overridden by steamtinkerlaunch updating itself. As of right now I seem to be functional anyway, so I’m not sure that step is needed anymore.
If however you care about launching Skyrim out of Steam and being able to pick up on steamtinkerlaunch and Vortex as part of your launch process, keep an eye on this. You may need to manually reinstate the symbolic link I’ve described here.
Part 5: Set launch options in Steam for Skyrim
This is a bit more important if like me you care about running Skyrim Together Reborn. You may or may not need this if you’re just running Skyrim with intent to run other mods.
The necessary launch options live in Skyrim’s settings in your Steam. Look in the General settings, and for the text box labeled LAUNCH OPTIONS. You need to enter a string that’ll look like this:
STEAM_COMPAT_DATA_PATH="/home/deck/.steam/steam/steamapps/compatdata/489830/" %command%The long complicated path shown here is pointing into the “compatdata” directory on my Deck, and to the subdirectory of that that specifically means Skyrim. (489830 is Skyrim’s game ID in this scenario.)
If you set up your Skyrim as a standard install the way I did, and your Deck is also more or less the standard install, this path will probably work for you. If it doesn’t, you will need to find the equivalent path on your device, wherever that may be.
If you care about running Skyrim Together Reborn, keep this launch options string in mind, you’re going to need it again when I get to talking about STR in this walkthrough.
Part 6: Permissions to set in Flatseal
Get Flatseal installed, as I mentioned above in the list of tools I needed.
What I did in that tool was go into the permissions assigned to protontricks, and there, I found a toggle to give protontricks access to all user files. I turned that toggle on. This was to try to facilitate getting into my various deep Steam directories in winecfg. The UI in question looks like this:
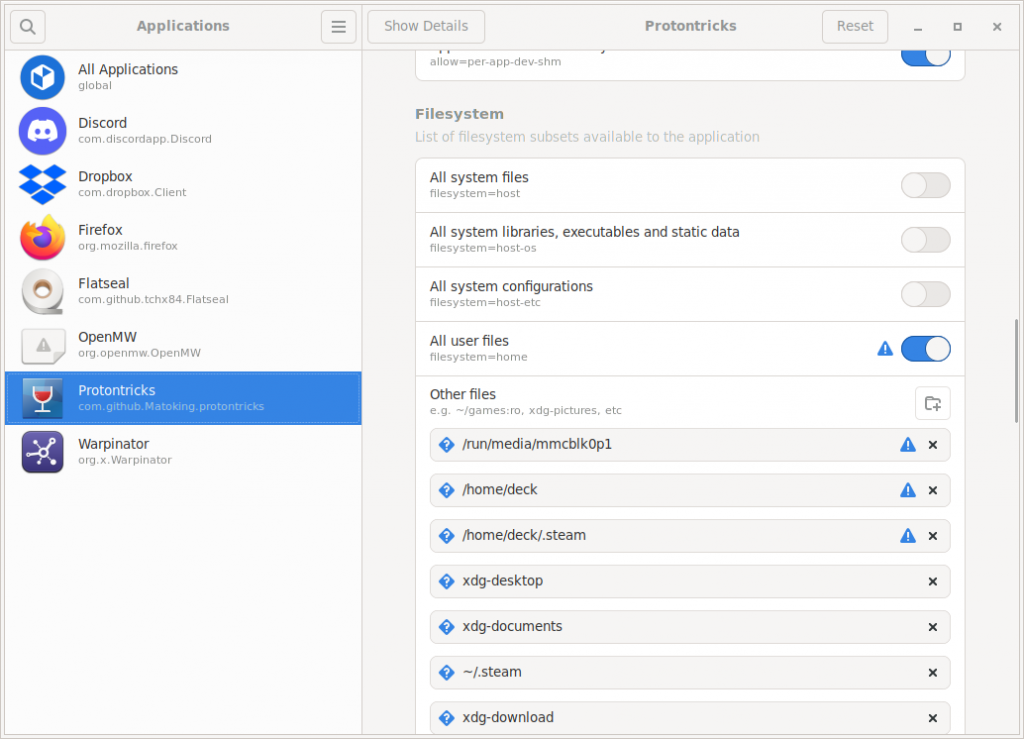
You will note in the above screenshot that in addition to the toggle for all user files, there are three directories at the top of the list that I also added. I am not a hundred percent sure they were necessary, but I added them as part of my experimentations. And now that my setup is working, I don’t want to risk removing them and confusing something. So you might wish to add those too.
If you can’t read the text in the screenshot, the directories listed are:
/run/media/mmcblk0p1
/home/deck
/home/deck/.steam
Part 7: Install Vortex
I linked to the steamtinkerlaunch repo’s instructions on how to install Vortex above, but here’s the link again. Follow their instructions for how to use steamtinkerlaunch to get Vortex onto the device.
To their instructions, I also want to add an additional bit of setup I did for my own convenience, which let me put an icon for Vortex onto my dock. The reason I wanted this was so that I could launch Vortex and work with mods without specifically having to launch a game first or go into my terminal, and steamtinkerlaunch didn’t give me a standalone desktop icon for that. So here’s what I did instead:
- Right-click on my Application launcher (left-most icon on the task manager)
- Select Edit Applications, which brought up the KDE Menu Editor
- Tapped the New Item button
- For “Name”, I entered “Launch Vortex”
- For “Description”, I entered “Launch the Vortex app via steamtinkerlaunch”
- For “Command”, I entered “/home/deck/stl/prefix/steamtinkerlaunch vortex start”
- I assigned a game controller icon in the icon selector to the right of the Name and Description fields
- I saved this shortcut under my Games section of the launcher
- And I also assigned it to the dock bar so I could easily get at it
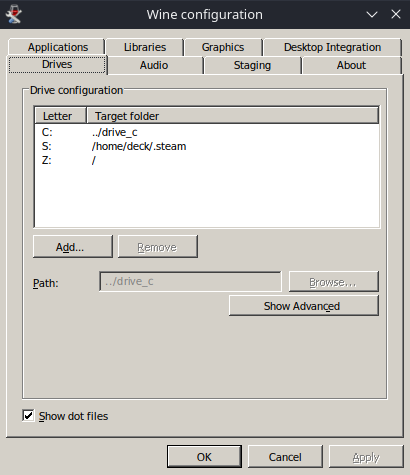
7a: Install winecfg.exe as a tool in Vortex and turn on dotfile support
I got winecfg.exe on my device, I think, when I installed Protontricks. And it came in handy multiple times getting things set up and running. One of the biggest problems I got it to solve was to give me access in various bits of UI to directories that start with a dot.
So you should have this available as a tool in your Vortex. The path I used to get at it is non-intuitive given that this is the Deck, but protontricks is simulating a Windows environment so here you go:
C:\windows\system32\winecfg.exeOnce you have it available as a Vortex tool, do these steps:
- Launch it.
- Click on the Drives tab in the control panel that comes up.
- You should see a checkbox labeled “Show dot files”. Turn this checkbox on.
- Click the OK button to save.
Here’s a screenshot of what the control panel should look like:
Again, keep this in mind if you are interested in Skyrim Together Reborn, because you’ll need to do something similar to this in a different place. I’ll get to that shortly.
7b: Activate Profiles if you want them (Optional)
I turned on Vortex’s Profiles support because I knew I would have a few different variations of mod profiles I’d want. You may or may not wish to do the same. My desired mod profiles were:
- No mods at all
- USSEP only (which I’m using for my primary Skyrim playthrough at the moment)
- All mods I’m interested in playing with, currently using this profile for mod experimentation
- Skyrim Together Reborn for specifically playing STR, with a very limited set of associated mods
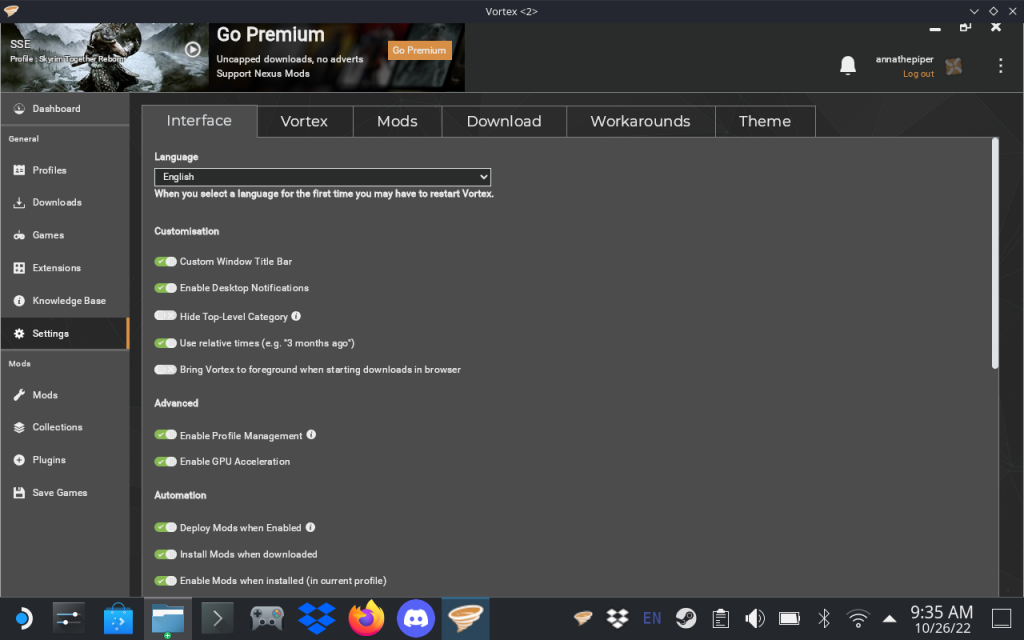
If you want to turn on profile support you can do that in the Vortex settings. You want the “Enable Profile Management” toggle underneath the “Advanced” section of the Interface settings, as per this screenshot:
If you turn this on you will then activate a “Profiles” item on your left sidebar. You can use this to manage your mod profiles. Here’s what mine look like:
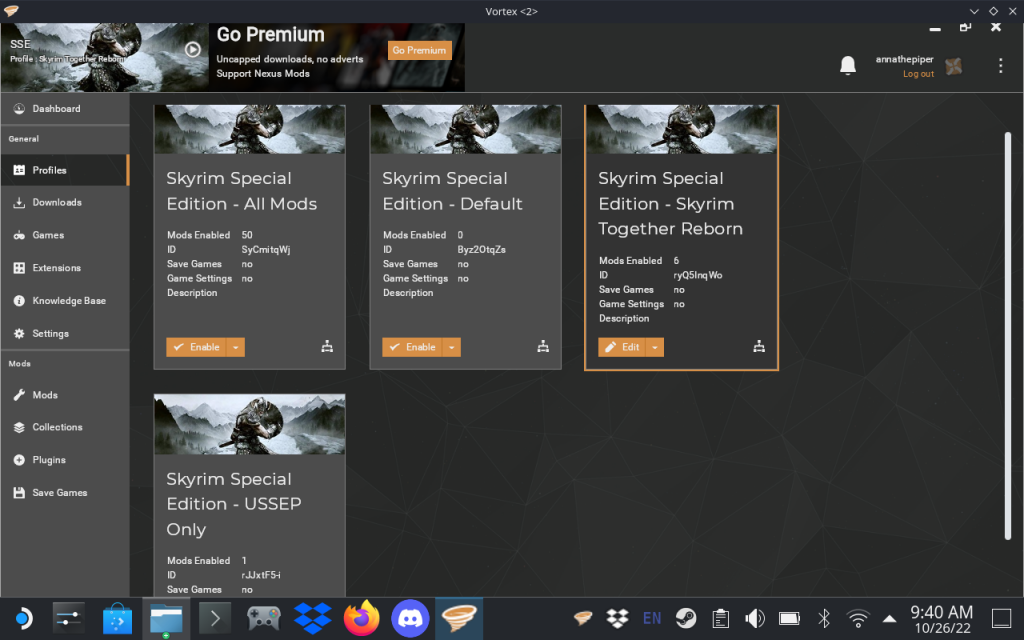
If you think you’re only going to play with a single mod profile, then again, this is optional. But if you’re also specifically interested in playing Skyrim Together Reborn, I do recommend this step just so you can have one profile for STR specifically, and another one for your regular Skyrim.
IMPORTANT NOTE: If you set up multiple profiles, just be sure to actually change profiles when you need to. I’ve gotten thrown by this when I try to launch STR and forget that I was still pointing at my regular Skyrim playthrough profile!
7c: Connect your Vortex to Nexus
Another thing you’ll need to do is to make sure your Vortex has access to your account on nexusmods.com. You should be able to do this on the Downloads tab of your settings. This screenshot is from Vortex on one of my Windows installs, but the UI is the same, so look for this:
Part 8: Start installing your desired mods
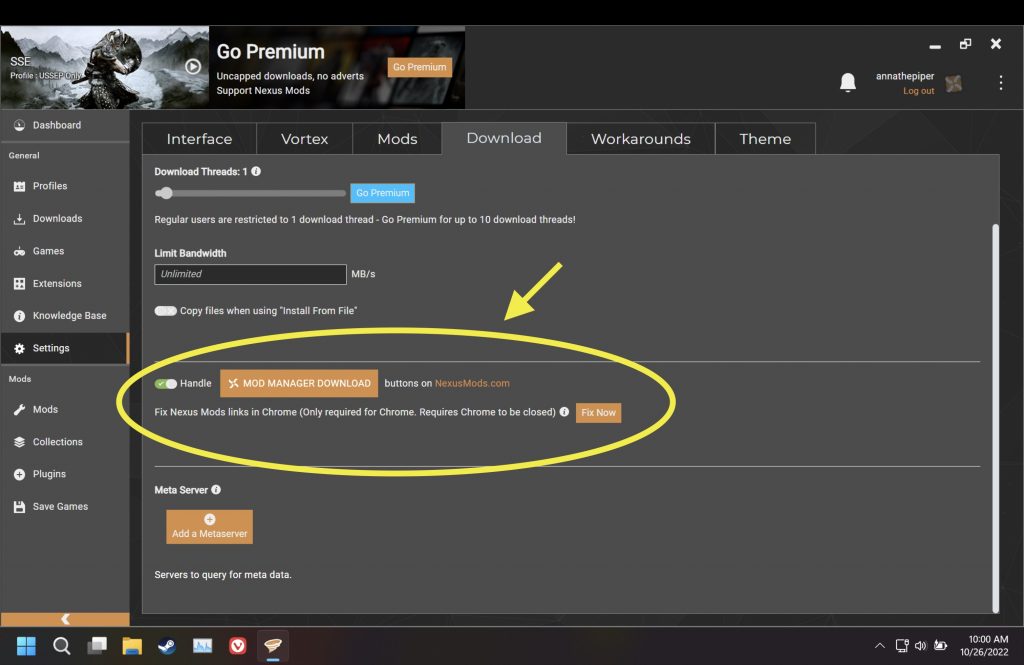
Here’s a small but notable complication I ran into once I started trying to put mods onto the Deck: something about how steamtinkerlaunch sets up Vortex didn’t correctly set up file associations. So even if your Vortex is connected to your Nexusmods.com account, you will run into issues trying to hit the download buttons up on the site. They won’t pipe correctly down into your Vortex.
What this means for you: you will have to manually download all mods you’re interested in, and pull them into your Vortex out of your Downloads folder.
I don’t know steamtinkerlaunch’s status on fixing this, though I did see it get reported up on their repo. So I recommend that you do go ahead and connect your Vortex to your Nexus account anyway, so that hopefully, if this is fixed in a future release, you’ll be ready.
Until that happens, you will just have to manually install all the mods you want. Which is annoying, and tedious, but doable.
I have not yet identified a workaround for this on the Deck, what file associations I could set up locally that would make Firefox (my current local browser) understand what to do with a Nexus download file when it sees one. So if anybody reports such a solution to me, I will update this post to reflect that.
8a: Copying installed mods off another system
Editing to add that another way to get your mods installed, as Shadark reminded me, is to do your mod configuration on a computer and then copy the entire set of mods over to your Deck. Ways you might do this include:
- External hard drive or flash drive that you could move from computer to Deck and back again
- Dropbox or some other similar cloud service (I can confirm that there is a Dropbox client available via Discover, I’m using it to move screenshots to my computer for posts here on this blog, including this very post)
- If your house LAN has an internal server you can use to move files around, like mine does
- Warpinator, which from what I’ve seen is a recommended tool to move files between a PC and a Deck
- If you set up SSH access to the device, you could use scp or maybe an sftp client to move files over
For me, the prospect of moving a bunch of files around that way is more tedious than just manually installing mods onto the Deck directly. But as with other portions of this walkthrough, your mileage may vary.
I do have mods set up on a couple of laptops, so at some point I may decide that it’ll be smoother to vet mods on those computers and then move them to the Deck when I’m ready to deal with them.
Part 9: Skyrim Together Reborn
Now I get to the part where I talk specifically about Skyrim Together Reborn. If this is not a mod you want to play with, you can skip this entire section. But if you do want to play STR, here is how I got that to work.
9a: Vortex vs. Mod Organizer 2
First and foremost let me note that Baguette on the STR Discord explicitly recommended that I use Vortex with STR on my Deck, not MO2. The STR wiki does include directions for installing STR via MO2, but the main use case for STR is on PCs–not on a Linux system, which is what the Steam Deck is. And while steamtinkerlaunch is doing a grand job of emulating a PC for purposes of letting you run games, that is a different use case. So for my specific situation, I went by Baguette’s recommendation and focused on Vortex.
If you want to consider using Vortex explicitly for STR and MO2 for everything else, that’s certainly an option, but it’s one I cannot speak to here in this walkthrough since I haven’t tried that scenario. I don’t know how well a setup that involves both Vortex and MO2 with steamtinkerlaunch would work. So far, in speaking with Shadark, who has been tinkering with such a scenario, signs are suggesting it could be problematic. If you want to go down that rabbit hole, you may need to reach out to the steamtinkerlaunch folks directly for help.
9b: Should you play with the Anniversary Edition of Skyrim?
The STR team explicitly recommends against playing with the Anniversary Edition active, as per their wiki page here.
Me, I’m doing my primary Skyrim playthrough with the Anniversary Edition, and I was not inclined to put that playthrough at risk by fucking with the AE files just for the sake of STR. But if you want to have the cleanest possible experience playing STR, you should probably follow the STR team’s instructions on this.
Otherwise, your options are:
- Play with the AE anyway, but just be aware that you’re on your own if STR breaks somehow, because the STR team is likely to tell you that they don’t support playing with the AE
- Figure out if you can have one Skyrim install somewhere with the AE active, and another one just for STR; for example, Skyrim + AE on your computer, and STR on your Deck
I’m fairly technically proficient as an SDET/QA Engineer, so I was willing to take the risk with option 1. Your mileage may vary. But that’s a judgement call you will need to make for yourself.
If in doubt, talk to whoever you might want to play STR with, and see if they also have the AE. It would be best for all people you want to play with to have the same agreed-upon configuration, just to minimize the chances of weirdness happening because party member A has the AE and party member B doesn’t.
One more thing to factor into your considerations here: even if you didn’t buy the Anniversary Edition upgrade, if you just have the last known build of the Special Edition and like me you purchased it on Steam, then you will still have a few bits of the AE available to you by default. Bethesda and Valve handed those out for free to everybody with a purchased copy of Skyrim’s Special Edition on the Steam store. These bits of content are:
- Fishing
- Survival Mode
- Rare Curios
- Saints and Sinners
So if you want to be completely AE-free for STR, you will need to follow the STR wiki’s instructions for disabling that content.
9c: What other mods do you need?
STR’s wiki page says they explicitly do not need you to install the SKSE. They do need you to install the Address Library for SKSE, which you can find on Nexus here.
Should you install the SKSE anyway? This is another judgment call you will have to make for yourself, and it depends entirely upon whether you want to try to run STR with any mods that actually require it. (For example, SkyUI, RaceMenu, etc.)
If you do want any other mods that require SKSE, then yes, you should install it anyway. But again, be aware that if you start modding your STR install above and beyond the required Address Library mod, you will be in the land of the STR team not being likely to support your questions if something goes wrong for you.
As with the AE, again, talk to your potential party members and see what mods everybody is interested in. Try to avoid potential instabilities caused by party member A having mods X and Y, and party member B having mods J and Q.
9d: My current STR mod profile
With the mods risk in mind, my STR profile is very limited. I am running the following in that profile on my Vortex:
- The “All in One (Anniversary Edition)” version of the Address Library plugin mentioned above
- Anniversary Edition of the SKSE
- STR itself
- SkyUI
- An additional plugin that fixes an issue with SkyUI not being properly set up as a “master” and therefore not enabling correctly once Skyrim launches, that plugin can be found here on Nexus
- USSEP, because there are certain bugfixes I am no longer willing to play Skyrim without, now that I’ve done a large amount of my primary playthrough with the USSEP active
And that’s it. If you want to echo what I’m doing, then set up your STR mod profile with these things specifically. Any other mods above and beyond that will be outside the realm of my direct experience, and therefore outside the scope of this walkthrough.
9e: Some steps you’ll want to do once you install STR
Here are additional steps you’ll want to do to get STR’s launcher working correctly:
- Temporarily set Skyrim in Steam to using Proton 7 as its compatibility tool so you can launch SkyrimTogether.exe in your Dolphin file explorer long enough to get the Wine prefix working
- Once you can launch SkyrimTogether.exe off the File Explorer, do a protontricks command on it to run winecfg for its prefix ID, and give it access to files and directories that start with a dot (see below)
- Then set Skyrim back to using Steam Tinker Launch
- Set up SkyrimTogether.exe in Steam
- Set STR’s compatibility tool to Steam Tinker Launch
- Set STR’s launch options to the same STEAM_COMPAT_DATA_PATH string I set for Skyrim above
- Add STR to the VORTEX collection created above
The protontricks command I mention in step 2 of these steps is this:
protontricks 489830 winecfgThis will launch the same UI you would have seen running winecfg via installing it as a tool in Vortex. You’ll want to do two things while the UI is up:
- On the Applications tab, tell it to set the default version of Windows to be Windows 10
- On the Drives tab, as you did before with running the UI from Vortex, turn on the checkbox for “Show dot files”
Side note about this: the game ID in the command I’ve given here is actually Skyrim’s game ID, not Skyrim Together’s. STR has a different game ID on my system. If the command I’ve given here doesn’t work for you, you may need to replace the game ID in the command with the appropriate one for STR, whatever that winds up being when you install it.
9f: Controller config tweaks
STR has critical functionality for connecting to servers to play on, and interacting with your party members. On a PC, this UI is launched either by the F2 key or by the Right Ctrl key.
Neither of these exist on the Steam Deck. So you have a couple of options:
- ALWAYS play STR on your Deck with a Bluetooth keyboard immediately handy, so that you have access to F2 and/or Right Ctrl
- Map buttons on your Deck to emulate those keys
I’m actually doing a mix of both here.
My Bluetooth keyboard doesn’t have a Right Ctrl button at all. And while it has function keys, I had trouble getting F2 to work properly to launch STR’s server connection UI.
So what I wound up doing was mapping a couple of the Steam Deck’s back buttons in my controller configuration. Skyrim doesn’t use these buttons by default, so they don’t already have assigned functions in the game. So you should be free to pick whichever of these buttons you like to represent F2 and/or Right Ctrl. I mapped both of those keys to back buttons, as well as designating one of the other back buttons for screenshots, just because I don’t like the Deck’s default two-button screenshot config.
However, I’m also keeping the keyboard handy when I try to play STR, just so I’m able to do things like typing passwords when connecting, or typing into the chat window in the same UI.
9g: What executable to point STR at when you’re launching
Once you have STR set up, you should see that it’ll launch the steamtinkerlaunch UI first, and that that UI may ask you to explicitly tell it what executable you should be pointing at.
With my STR profile active in Vortex, with the SKSE active in that profile, I don’t need to tell it to launch the SKSE first. I go straight to telling it to launch SkyrimTogether.exe.
9i: How to tell you’re launching correctly
When STR launches, if your setup is like mine, you should see a nifty double dragon logo first before it switches over to the gold AE dragon logo. Look for both of these to confirm that STR is loading correctly. If you never see the double dragon, then you’re launching regular Skyrim, not STR.
And once the game is loaded, I recommend doublechecking the in-game mods menu, and going into the load order from there, just to make damn sure that all of your mods are loading as expected. For my setup, this means I only see three things inside the game, rather than the six I listed above. But I do see the USSEP, SkyUI, and Skyrim Together when I look at my load order in-game. As long as I see those three things are present and enabled, then I know I’m good.
Couple other troubleshooting suggestions I’ve periodically seen:
- If I try to launch STR and it loses track of the SkyrimTogether.exe executable, the usual answer to this is to go back into my Vortex and doublecheck that the STR profile is active. If that profile isn’t active, the executable disappears. So doublecheck that.
- If STR launches and I see SkyUI bitching about the SKSE not being available, my usual solution for this is to doublecheck Vortex and make sure, again, that the correct profile is active. But also to doublecheck that the correct mods are active, and that the SKSE is active as a primary tool for your mod profile.
And as always it’s a good idea to make sure that your mods are as up to date as possible. This came into play for me a couple of times when Bethesda dropped the 640 build and broke all the mods in the world. It took a while for the SKSE to catch up, and STR had to catch up as well.
So just be aware that if Bethesda drops any other surprise updates, this may impact your ability to play STR until all necessary mods, STR itself as well as anything else you want to run with, catch up.
9i: Other recommendations
Depending on who you’re planning on playing STR with, if you’re going to do it on the Deck, you may also wish to install the Discord client directly on the device so that you’ll have access to voice chat. Otherwise, if you’re on a voice chat on your computer and you have a headset on or earbuds in for that, you won’t be able to hear what’s going on in the game. And that’s no fun!
Also, you may have already seen that the Deck’s battery life is not exactly stellar. I’ve found I can usually get a couple hours in regular Skyrim if I’m playing without being plugged in. But I also usually want to play longer than that, so if I’m on the couch I always plug the device in. STR has additional server communication it has to do that regular Skyrim doesn’t care about, so this is liable to eat your battery life faster.
So I’d recommend you play plugged into a nearby power strip. Or else dock the Deck, and pipe it through your television, or an external monitor.
One more thing: I said this already above, but I’m calling it out again here because it’s important. If you set up your Deck with multiple mod profiles, for example one for your regular Skyrim and one for STR, be sure to change profiles in Vortex when you want to switch from regular Skyrim to STR and vice versa.
Otherwise you may find that you’re launching STR when you don’t mean to, or that you’re not launching STR when you do mean to.
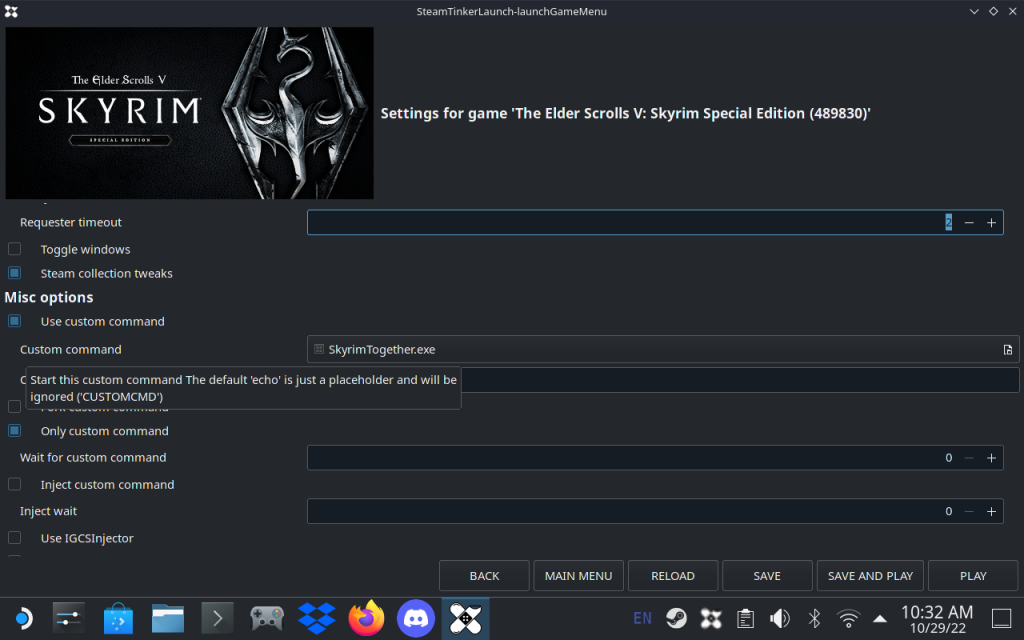
I’ve also found that I sometimes need to remind the steamtinkerlaunch UI what executable it needs to run, just after I’ve changed profiles. You can do this via the following steps:
- Launch your game (either Skyrim or STR, whichever one you’re playing at the moment)
- When the steamtinkerlaunch UI comes up, hit the Main Menu button
- Then hit the Game Menu button
- On the resulting screen, right about in the middle, you should see the control for selecting your executable
- If you’re loading regular Skyrim, you want SkyrimSE.exe in your main Skyrim folder
- If you’re loading STR, you want SkyrimTogether.exe, which is in <your main Skyrim folder>/Data/SkyrimTogetherReborn
Here’s an example of the UI you should be looking for:
I find it slightly annoying to have to remember to change profiles, so I’ve taken to doing my main Skyrim playing on my new Mac computer, where I have another viable mod setup in a Windows 11 VM. But playing your main Skyrim on a computer or other console isn’t an option for you, again, just be careful to remember to change profiles on your Deck when you need to switch back and forth between regular Skyrim and STR.
9j: “So if you have STR running on your Deck, Anna, how’s that working out for you?”
As of this post going live I have had two STR play sessions, involving myself, my wife, and an online gamer friend of hers who’s the one actually running the STR server we connect to.
And I’ll say straight up that the experience has been kind of hilariously unstable, but in ways we’re not entirely convinced is STR’s fault. Note that we are running with the AE involved, and the mods I listed above, so it’s entirely possible that we’re introducing instability because of this.
And we’re specifically fine with that, because we wanted the AE as well as the specific mods we’re using. Plus, we’re actually highly entertained by the weirdnesses we’re seeing, and I’ve decided it’s Sheogorath’s version of Skyrim. 😉 However, if you’re not prepared to risk instabilities and you want a cleaner STR experience, see my commentary above about re: explicitly following the STR wiki’s instructions for how to get set up.
If you want more deets on how my STR play sessions have gone so far, you can find those posts on the Skyrim Together Playthrough page.
Conclusion
I think that’s everything, compiling all the critical bits of my previous posts on setting up my Deck into this single walkthrough. If you have any questions, drop me a comment here, or ping me on Twitter!
Angela Korra'ti
As Angela Highland, Angela is the writer of the Rebels of Adalonia epic fantasy series with Carina Press. As Angela Korra'ti, she writes the Free Court of Seattle urban fantasy series. She's also an amateur musician and devoted fan of Newfoundland and Quebecois traditional music.
2 Comments
Pingback:
Pingback: