In Which Merawen Slays Vahlok the Jailor and Karstaag the Frost Giant
This session was basically all about resolving the Lost Legacy quest, in which you help the scholar Tharstan investigate Vahlok’s Tomb, and then going and taking out the formidable frost giant Karstaag.
And oh yeah, I guess the rieklings get to enlist me to help them keep Thirsk Mead Hall. You better be grateful for this, you little blue knuckleheads. 😉
Highlights
- Play date: 10/4/2021
- Session number in this run: 65
- Picked up again in Vahlok’s Tomb
- Did the trapdoor to unlock the southern and northern exits from the main chamber
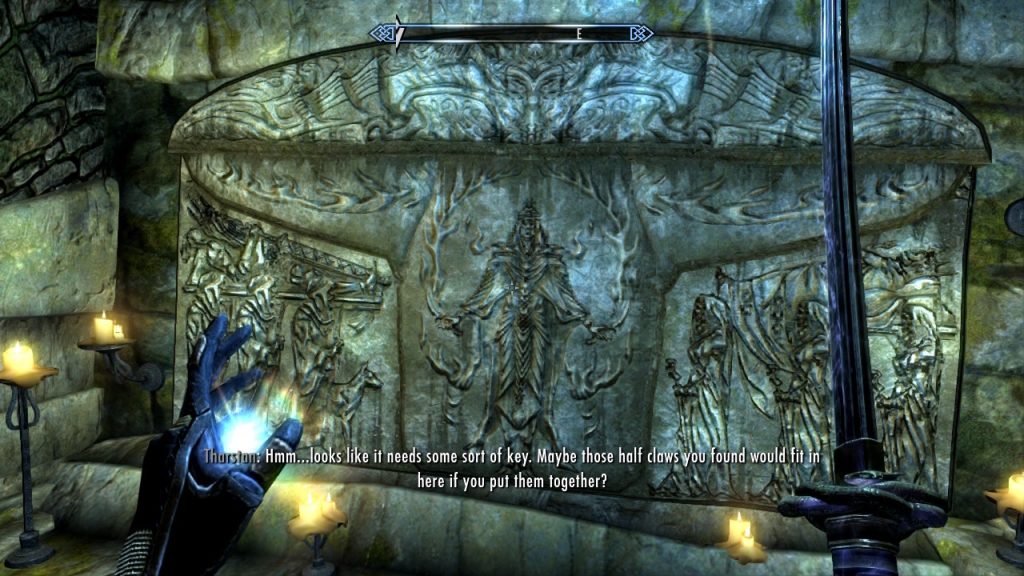
- Did both the northern and southern wings of the dungeon, reached the Word Wall in both, and took out the draugr—including the two Deathlords that had the halves of the Amethyst Dragon Claw
- Returned to main chamber and went across the bridge to the section with the magical bridges
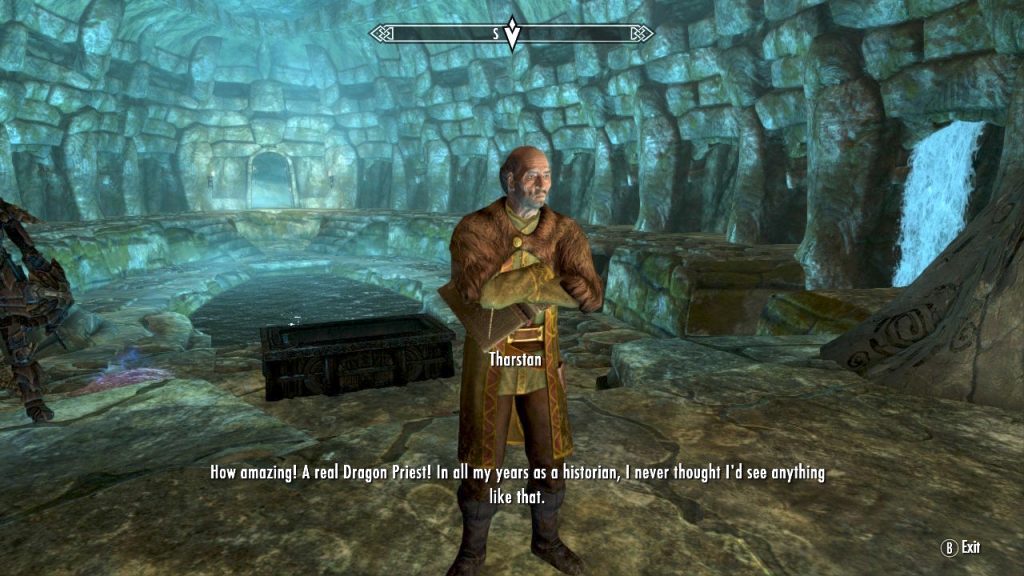
- Cleared the rest of the dungeon; got third word of Battle Fury; killed the Dragon Priest Vahlok
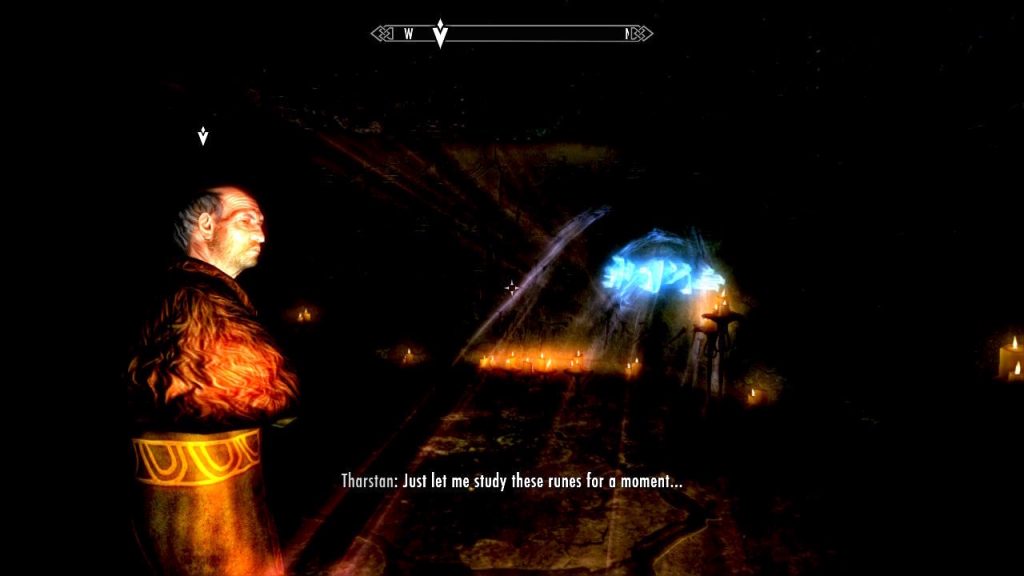
- Left Tharstan happily studying the last Word Wall
- Back to Raven Rock to drop off stuff
- Chatted with Captain Veleth and got his Emberbrand wine quest (just to do a new thing)
- Returned to Severin Manor to drop off a bunch of things
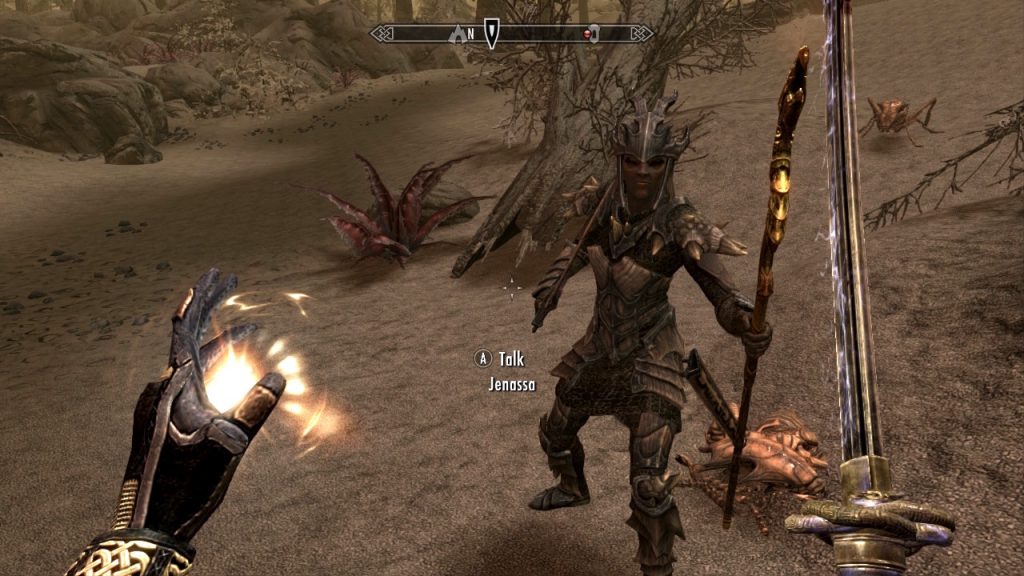
- Took the time to recharge Jenassa’s weapons, also the two staves she swiped
- Found the wine cache in a barrel not far from Severin Manor
- Headed back out for next jaunt
- Random Imperial in mixed armor; Jenassa fried her with her Staff of Fireballs
- Found Brodir Grove and cleared the place of reavers; got Stormfang from reaver lord; cleared an East Empire strongbox
- Found the Ramshackle Trading Post, and another East Empire strongbox
- Traced stream to a gate that was barred from the other side
- Re-found Dark Elf camp from before; another East Empire strongbox
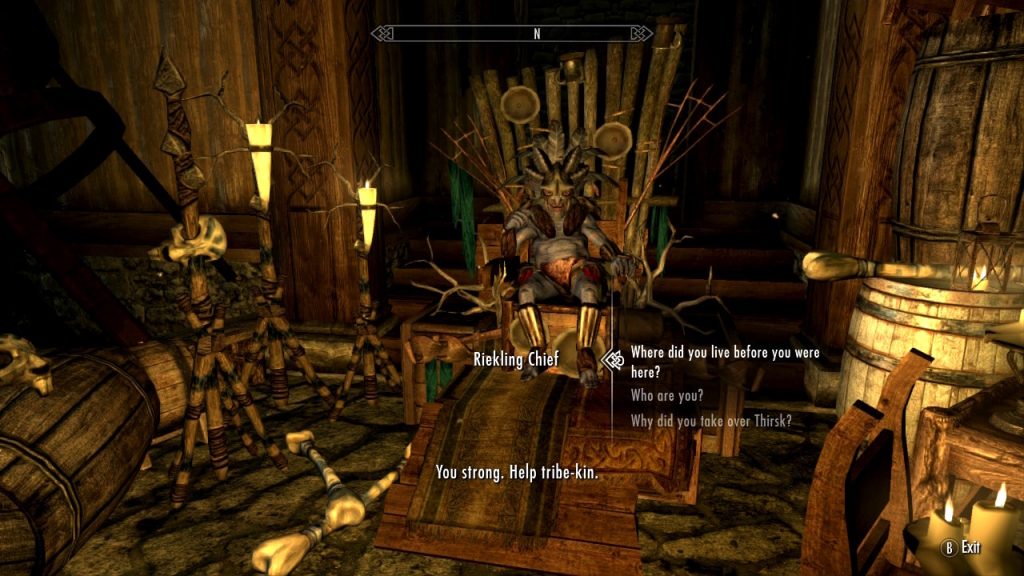
- Found Thirsk Mead Hall, and HI RIEKLINGS; went ahead and started the rieklings quests, guess I’m going to help these little blue guys keep the place after all
- Brought Bilgemuck back to the chief; he asked me to go get him 10 scathecraw samples
- Headed north from there; took out an ice wraith
- Found Snowclad Ruins, and took out three werebears there
- Took out two frost trolls who’d apparently killed a reaver in bonemold armor
- Used a bit of Whirlwind Sprint to get to Castle Karstaag Ruins
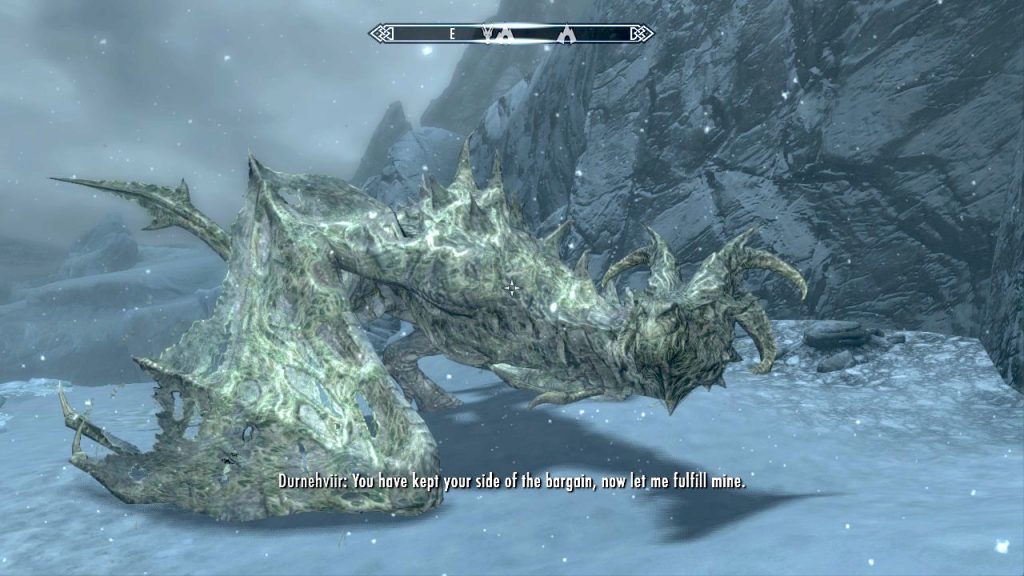
- Summoned Durnehviir for his final round
- He flew off and it sounded like he attacked something, but I couldn’t see what?
- Ran around a bit trying to find him, no sign; did find another trio of werebears, though (but not Torkild)
- Helped Jenassa take out a snowy sabre cat; I got in a whack or two but I’m pretty sure she mostly killed it with her staff
- Returned to Castle Karstaag Ruins; actually took out Karstaag in one go, wow; had to use several potions of Ultimate Healing, but was able to take him out with the benefit of the Dragonbone Bow and its fire damage
- Searched down into the Castle Karstaag Caverns, which were huge; finally found the body of Esmond Tyne after battling a bunch of rieklings
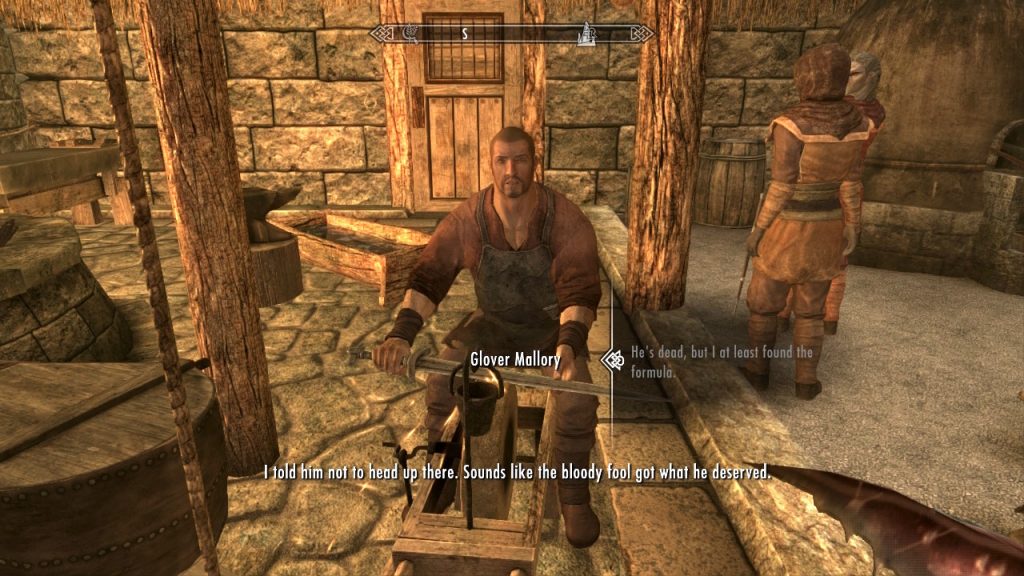
- Got the bonemold formula off his body and returned to Raven Rock
- Gave the formula back to Glover, who gave me the key to his basement and permission to take anything I wanted from there
- I took almost everything down there because he did say I could! Though I left things like food items and tools and such; mostly I was there for the Blackguard’s Armor
- Blackguard’s Armor visually looks like Linwe’s Armor, but same enchantments as Guild Master Armor; not really competitive with any of my other armor sets though, no match for Blades or Nightingale or dragonscale
- Also, while I like the style of the Blackguard’s Armor, not a fan of the gray color on Merawen
- Did some smithing to make a bunch of jewelry as well as to improve the Blackguard’s Armor up to Legendary
- Did some enchanting of jewelry items as well, though I realized that that doesn’t help me level up now that Enchanting is at 100
- Left off there for the night
Finishing the Lost Legacy quest
Not much new here to comment on, I didn’t run this dungeon significantly differently than I did in Alarrah’s run. I do still enjoy it! In no small part because Tharstan is a delightful character, and I continue to be tickled by his clearly being the smartest scholar in all of Tamriel—just because of being very sensible and understanding that he’s old and frail, and not equipped to go alone into a draugr hive!
And also sensible enough to dive for cover when draugr show up, and leave taking them out to the two well-armed Dunmer women he’s engaged to watch his back.
I never fell off any of the magically generated bridges, so I never had to deal with falling down to the lower level of the dungeon and fighting the Corrupted Shades that are down there. It’s interesting to me though that these are apparently a weaker version of the same Corrupted Shades that appear in Kilkreath, created by Malkoran. I am not clear on the backstory here, why there are also Corrupted Shades here?
Because Vahlok was not, as I understand it, a necromancer. He was a Dragon Priest who fought against Miraak, but necromancy is not listed on the wiki as part of his magical skill set. So I’m not sure why Corrupted Shades would be in his tomb. Unless they’re former servants of Miraak? I dunno!
At any rate, Jenassa and I cleared the place, and took out Vahlok. We left Tharstan happily studying the last of the Word Walls for Battle Fury. And I sure hope we didn’t miss any draugr in there, old man! Do try to return safely to the Skaal village, okay?
Recipe for Distraction quest
This one was super-brief, a little errand you can do for Captain Veleth right inside Raven Rock. Apparently some of his men in the Redoran Guard have taken to hoarding a stash of Emberbrand Wine, which is impacting their ability to stay focused on their jobs, and you have the opportunity to volunteer to find the cache of wine for him.
He thinks it’s stashed somewhere in one of the abandoned houses on the edge of the town. But your options for those are not exactly plentiful. There’s exactly one abandoned building, and a couple of foundations of previously destroyed buildings. And the wine was in a barrel at one of these foundations. Not exactly difficult to find.
And Veleth was all “gosh it’d be awesome if you find this for me because I do not have the time”—dude, I’ve seen you wander back and forth through Raven Rock four or five times now, having arguments with Fethis about your relationship with his daughter, and lamenting with Dreyla about her father being an asshole! You can’t find a hole in your busy schedule of romantic angst to go actually find your men’s cache of illicit booze? Okay fine I’ll do it for you.
Lol. So I found the one for him, and told him I found it, and that was that.
Kept the wine for myself, though. I’ve built up quite the stash of booze in Severin Manor!
The Chief of Thirsk Hall quest
Did assorted miscellaneous things as noted in the highlights up above, and then the next thing of interest was finding Thirsk Mead Hall and triggering the riekling side of the fight over who should be owning the place.
I figure, since I went through the Nord camp and not a single one of them actually talked to me un-prompted, and the rieklings did intercept me and ask for help (for values of ‘ask’ meaning ‘you strong, you help tribe-kin’ being more of a demand than a request, really), Merawen will come down on the side of the rieklings here.
Practically speaking, I’m sure this is just a matter of, you need to actually speak to any of the Nords in Bujold’s Retreat if you want to take their side of the fight. But Merawen doesn’t know that!
And, welp, the rieklings did ask first.
So I got the chief his prize beast back, and then got his request that I bring him ten “redgrass” samples. That part I haven’t done yet, since I elected to go northward and try a few other side tasks first.
Taking out Karstaag
I headed more or less due north from Thirsk Mead Hall. On the way, I found the Snowclad Ruins site, which I’m not sure I found before as Alarrah; I don’t have that locale documented in Alarrah’s posts, at least not by name.
Eventually though I made it to Castle Karstaag Ruins! And decided it was time to see if I could take out the frost giant.
Before I did that, though, I got in one last round of summoning Durnehviir, just to conclude my bargain with him. Sure was curious though as to what he attacked after I summoned him! Because I heard him roaring and spitting fire, and it sounded like he may have thrown a Drain Vitality Shout, too.
Took out another trio of werebears while I was trying to figure out where Durnehviir went.
And once the werebears were down, I finally just decided to head on in and see if Jenassa and I could take down Karstaag.
Answer: yes! And I was pretty chuffed to be able to do it only in one round of fighting, too. He did beat up Jenassa pretty badly and send her into that “kneeling” state, at least once. And he would have killed me, I think, if I hadn’t been right smack on top of the state of my health bar and chugging down potions of Ultimate Healing as fast as I could.
Thanks to my Fiery-Soul-Trap-enchanted dragonbone bow, though, I took him out. \0/
Finishing the Paid in Full quest
Finally also got the opportunity to finish up the Paid in Full quest as well, which involved tracking down Esmond Tyne and getting back the improved bone mold formula from him.
Esmond is, of course, dead. But since I’d reached the Karstaag locale, I was able to then go down into the Castle Karstaag Caverns to find his body.
This took a little doing! Because the place was huge and brimming full of rieklings. Definitely the biggest riekling settlement I’d run into anywhere on Solstheim, in either Alarrah’s playthrough (when I didn’t get down into this cavern system) or Merawen’s.
Also, I came into the place backwards—from the cavern with Karstaag in it, as opposed to the exterior exit. So I had to trek through the whole place before I finally reached the part where Esmond had died.
Once I got that improved bonemold formula, I was able to return with it to Raven Rock and give it back to Glover. Which got him to give me permission to make off with a whole bunch of thievery-related things he had stashed down in his basement.
The most notable items of that being, his set of Blackguard’s Armor. Which visually looks pretty much exactly like the armor I swiped from Linwe when I took out the Summerset Shadows, but which seems to have enchantments on it more or less equivalent to the Guild Master Armor.
And that’s pretty neat, though I think I won’t actually wear the armor. It’s not enough of a competitor for my better armor sets. Plus, the gray color isn’t exactly flattering on a gray-skinned Dunmer!
However, that wasn’t the only notable item down there. There was also a letter from Glover to his daughter—who turns out to be someone Merawen has met, i.e., Sapphire of the Thieves Guild. And there is an optional quest item you can do to take this letter to Sapphire and let her know what the hell happened to her father.
Which I am going to do. Though I think it appropriate to point out that the game gives you no opportunity to ask Glover about the personal letter he left down in the basement along with the rest of his Guild stuff. Or to ask his permission to take that letter off to his kid.
I’ll have to invoke right of headcanon here, because I feel like Merawen wouldn’t just steal the guy’s private family correspondence. She is a thief, sure, but he’s Guild. And it’d be shitty of her to go behind his back and take that letter off to his daughter without actually asking his permission to do so first.
And while it can be argued that he did give her free access to anything in the basement, and the letter being in the basement therefore includes the letter in that blanket permission by default, point remains. It’s personal family correspondence.
So I’m going to take the liberty of assuming that Merawen will in fact go to Glover and tell him, “Look, you gave me free rein to take anything in your basement, but I’m pretty sure you didn’t actually mean to include this in that, did you?” And she’ll show him the letter. And tell him, “I know Sapphire. She’s a credit to the Guild. Did you have a plan on when you were going to send this letter to her?”
“Uh… no. Not yet. I haven’t been brave enough to think about it.”
“I can take it to her for you next time I return to Skyrim. She’s your daughter. She has the right to know you’re alive. Do I have your leave to do this?”
“Yes… please. I’d appreciate it.”
“Good. If you ever want to see her, this is necessary. I’ll send or bring back word of what she says.”
Next time
Fahlbtharz, Kagrumez, and White Ridge Barrow all still need clearing. And I do still gotta find that werebear!
Screenshots
Editing to add
- 11/17/2023: Fixed missing gallery, and added a session number.
- 10/4/2024: Added play date to highlights section. Converted gallery to native WordPress one.
Angela Korra'ti
As Angela Highland, Angela is the writer of the Rebels of Adalonia epic fantasy series with Carina Press. As Angela Korra'ti, she writes the Free Court of Seattle urban fantasy series. She's also an amateur musician and devoted fan of Newfoundland and Quebecois traditional music.